WEO Media
Email Instructions 
If you are setting up a brand new email, or if you are setting up a brand new computer/mail client with your email information, please go to help.emailsrvr.com for walkthrough instructions. If you need to change settings on an existing email account as a new WEO client, please click on an image below to expand instructions.
Click on an image below to expand instructions.
 Outlook 365 InstructionsInstructions for setting up email accounts in Microsoft Outlook 365
To use Outlook 365 for sending and receiving email, follow the steps below.
Step 1: Open your Office email client and if the app does not prompt you to add a new account, go up to the upper left corner and click on File.  Step 2: Click on Add Account.  Step 3: You will get a popup box asking you to enter in an email address. Enter in your email address and click on the "Advanced options". 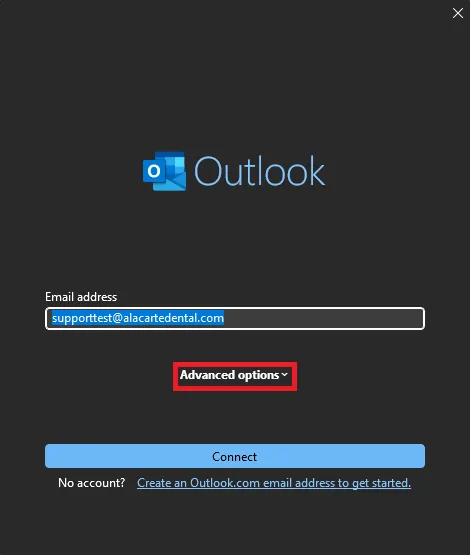 Step 4: Check the box next to "Let me setup my account manually" then click the Connect button. 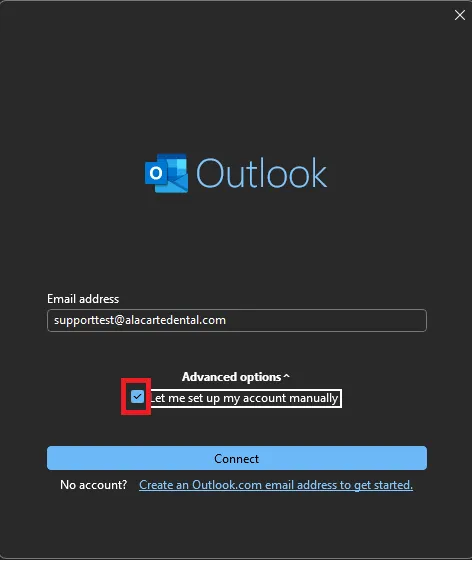 Step 5: In the Advanced setup menu, click on IMAP. 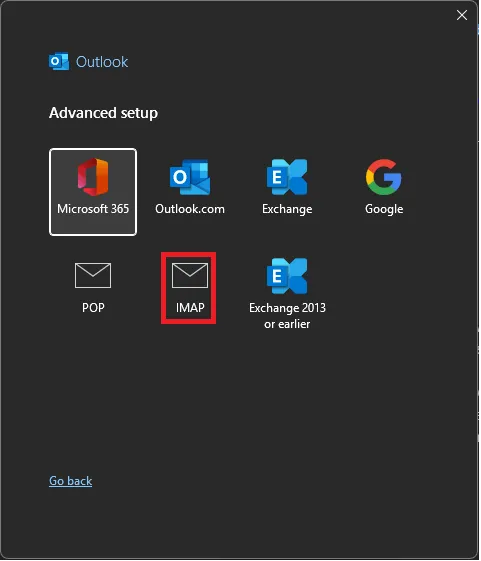 Step 6: Enter your password and click the Connect button in the lower right corner. 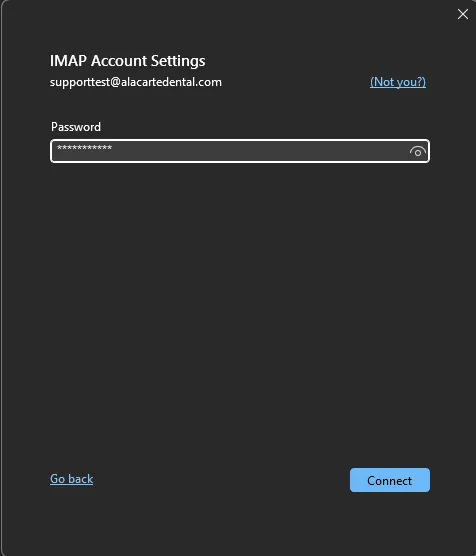 Step 7: Microsoft Office will attempt to connect to the server and once its successful, you will get a message that the Account was successfully added. Click the Done button.
*Note: If you have the check boxes for "Let me set up my account manually" under the Add another email address or the "Set up Outlook Mobile on my phone, too" checked, Uncheck those boxes before clicking the Done button. 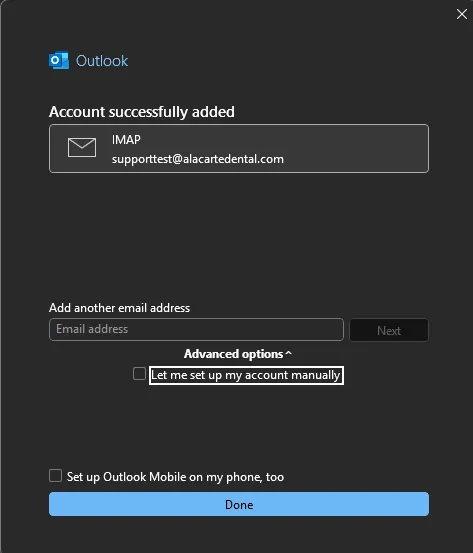 Step 8: Troubleshooting tip - In the new Outlook, you don't have the option to enter the server settings. If you need to change/correct server settings in the new MS Office, you will need to be in Outlook and click on File.  Step 9: Click on Account Settings then click on Server Settings. 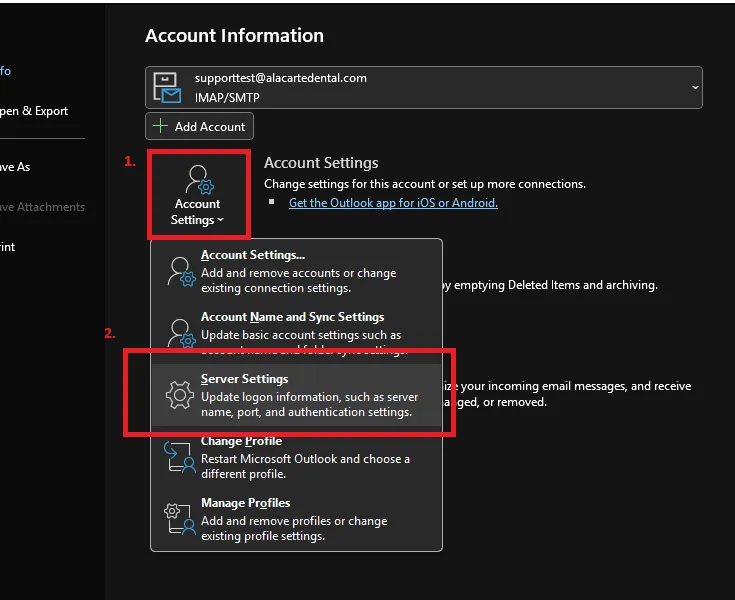 Step 10: This will give you access to the Incoming and Outgoing mail settings. When you setup the email account, it automaticly sets these settings up with our server information, port# and encryption method. 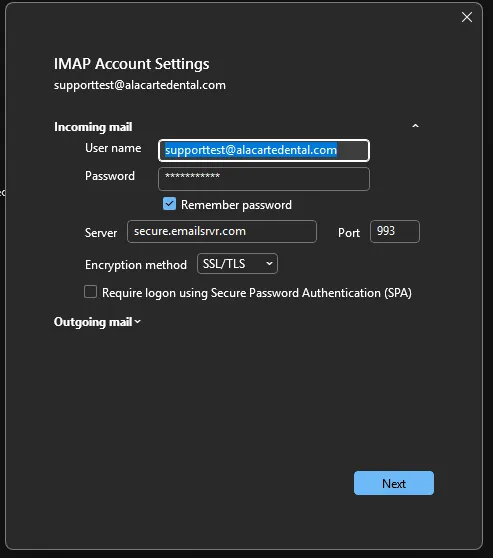 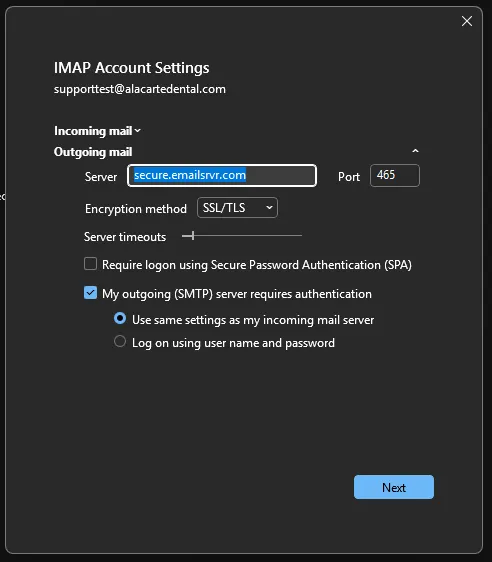
 Instructions SafelistInstructions to Add WEO Media to Safelist in: Outlook 2010
Outlook 2010: Open Microsoft Outlook 2010.
| 1. |
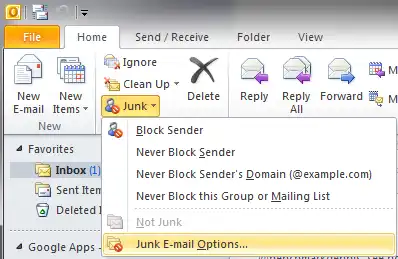
In the home tab, click the Junk drop down menu
|
| 2. |
Then click Junk Email Options
|
| 3. |
Navigate to the Safe Recipients tab
|
| 4. |
Click the Add button
|
| 5. |
Type in @weomedia.com, then click okay |
Instructions for setting up email accounts in Microsoft Outlook 2010
To use Outlook 2010 for sending and receiving email, follow the steps below.
Step 1: Open the program by clicking the Microsoft Office Outlook icon located on your computer.  Step 2: Click File located on the top menu. Click on Add Account under Account Information... 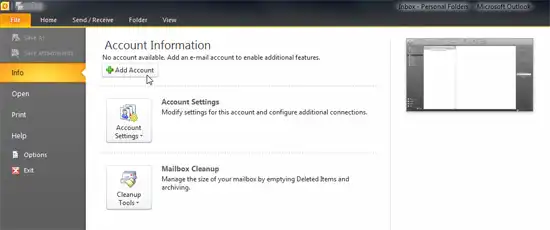 Step 3: Select Manually configure server settings or additional server types and click Next. 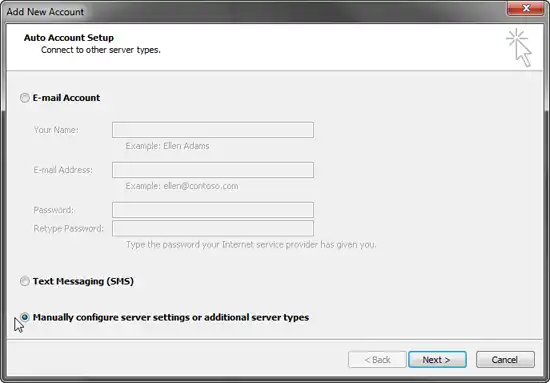 Step 4: Select Internet E-mail and click Next. 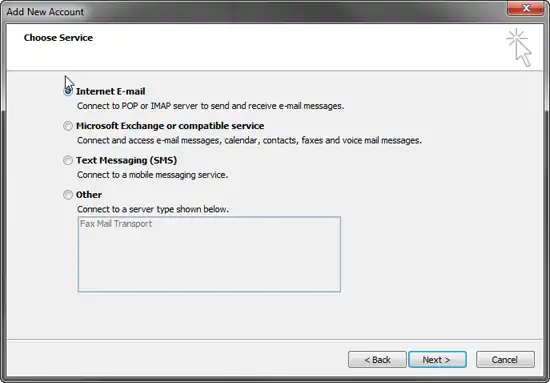 Step 5: Fill in your account information using Server Information listed below. Once completed click More Settings... 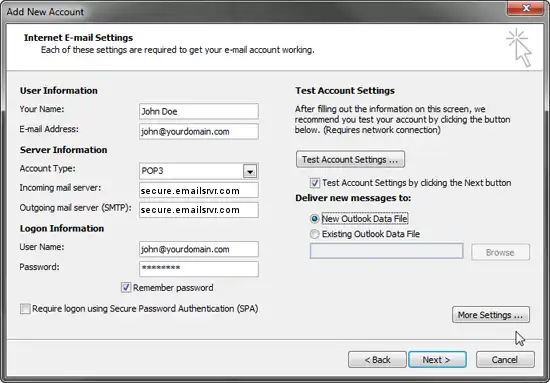 Step 6: Click the tab that says Outgoing Server. Check the box for My outgoing server (SMTP) requires authentication. Click on the Advanced tab. 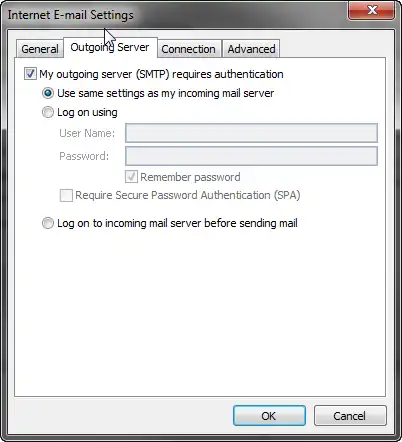 Step 7: Change the Outgoing server (SMTP) to 465. Select SSL from the drop down menu under Use the following types of encrypted connection then click Ok. 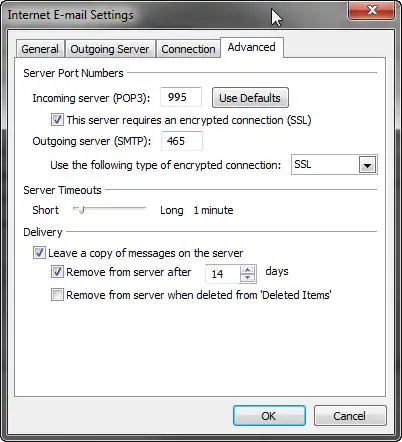 Step 8: Click Next. 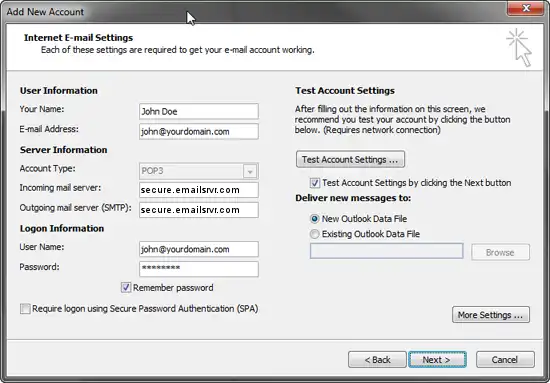 Step 9: Click Finish to complete the setup. 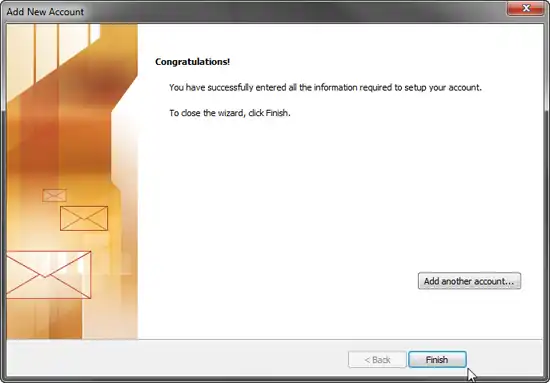
 Instructions SafelistInstructions to Add WEO Media to Safelist in: Outlook 2007
Outlook 2007: Open Microsoft Outlook 2007.
| 1. |
Select Actions from the toolbar at the top of the screen.
|
| 2. |
Select Junk E-mail.
|
| 3. |
Select Junk E-mail Options.
|
| 4. |
Click the Safe Sender tab.
|
| 5. |
Click Add.
|
| 6. |
Type in @weomedia.com, then click okay |
Instructions for setting up email accounts in Microsoft Outlook 2007
To use Outlook 2007 for sending and receiving email, follow the steps below.
Step 1: Open the program by clicking the Microsoft Office Outlook icon located on your computer.  Step 2: Click on Tools located on the top menu. Scroll down and click on Account Settings... 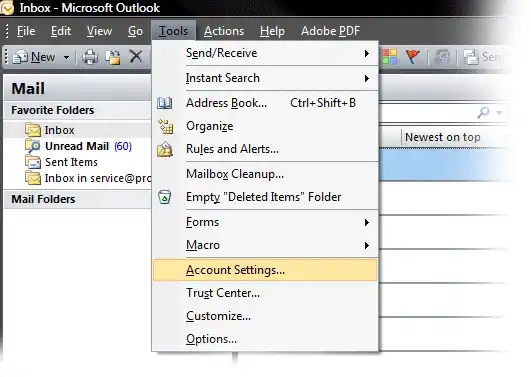 Step 3: Select the New button to add a new email account. 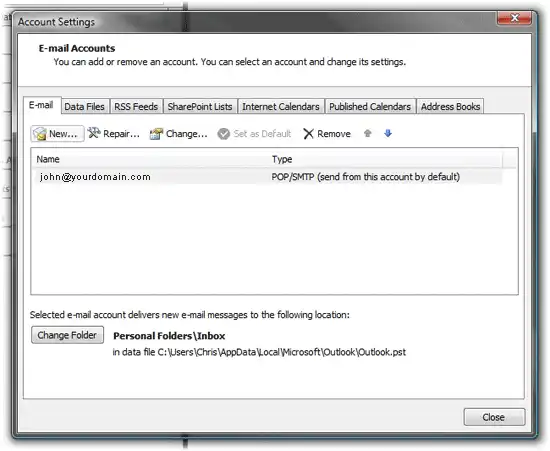 Step 4: You will be prompted to specify the type of mail server you use. Select POP3 and click Next. 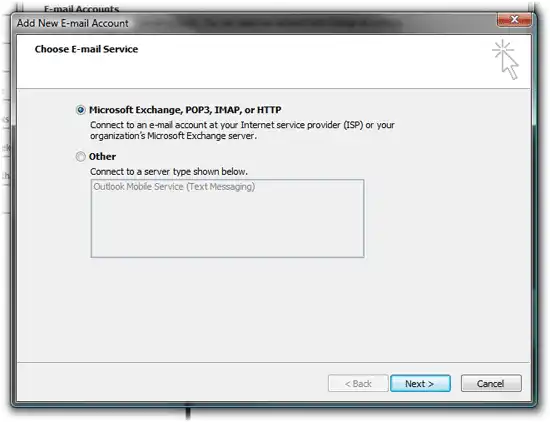 Step 5: Check box at the bottom left Manually Configure Settings and click Next. 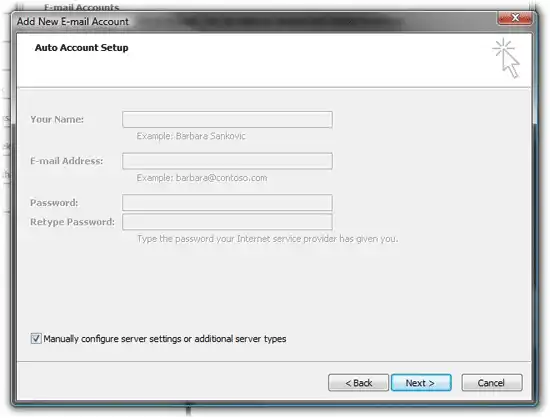 Step 6: Select Internet E-mail as the E-mail Service. 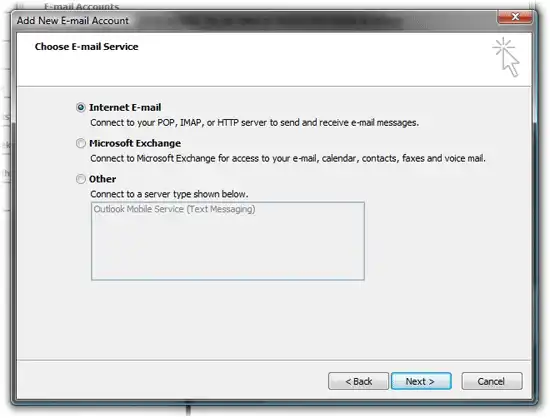 Step 7: Fill in your account information using Server Information listed below. Once completed click More Settings... 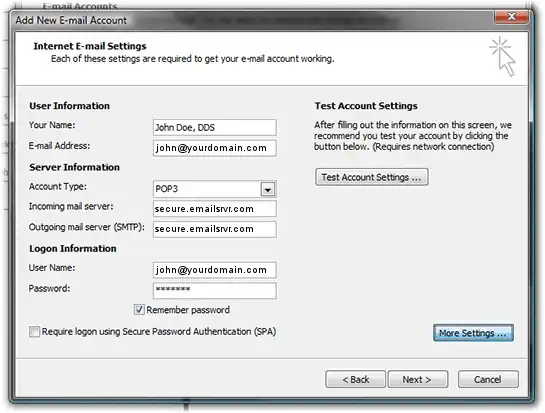 Step 8: Select the Outgoing Server tab. Check the box next to My outgoing server (SMTP) requires authentication. 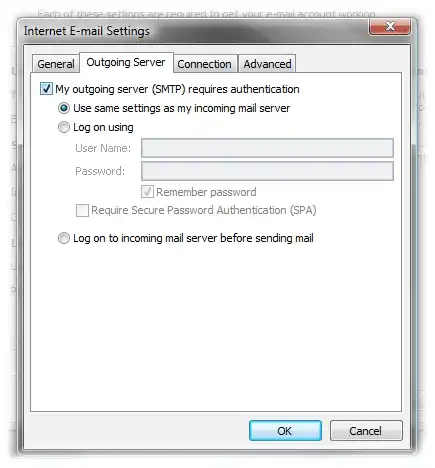 Step 9: Select the Advanced tab. Configure the Incoming and Outgoing ports as follows then click OK. 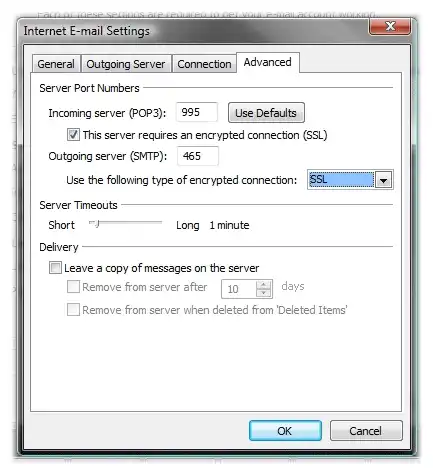 Step 10: Select the Finish button to complete email setup. 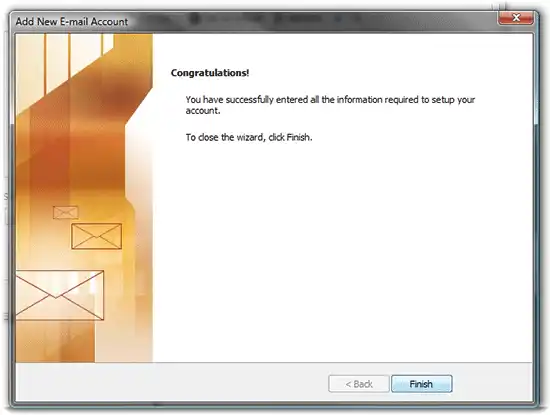
 Instructions SafelistInstructions to Add WEO Media to Safelist in: Outlook 2003
Outlook 2003: Open Microsoft Outlook 2003.
| 1. |
Select Actions from the toolbar at the top of the screen.
|
| 2. |
Select Junk E-mail.
|
| 3. |
Select Junk E-mail Options.
|
| 4. |
Click the Safe Sender tab.
|
| 5. |
Click Add.
|
| 6. |
Type in @weomedia.com, then click okay |
Instructions for setting up email accounts in Microsoft Outlook 2003
To use Outlook 2003 for sending and receiving email, follow the steps below.
Step 1: Open the program by clicking the Microsoft Outlook 2003 icon located on your computer.  Step 2: Click on Tools located on the top menu. Scroll down and click on E-mail Accounts...  Step 3: Select Add a new e-mail account and click Next. 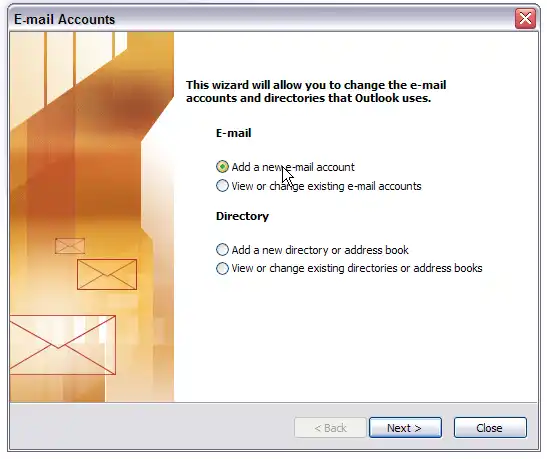 Step 4: You will be prompted to specify the type of mail server you use. Select POP3 and click Next. 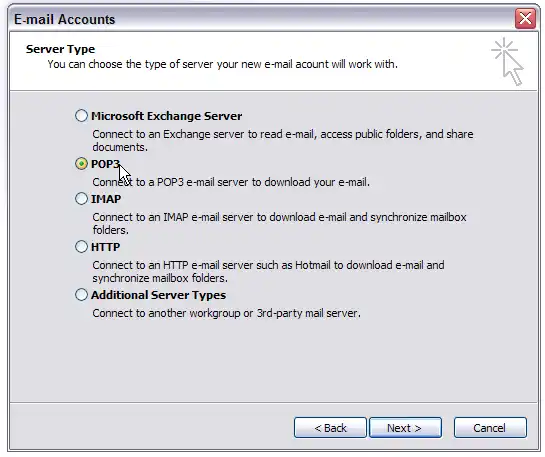 Step 5: | • |
Your Name: Enter the display name that other people will see when you send them e-mail. It should usually be your real name, such as John Doe.
|
| • |
E-mail Address: Enter your full email address for this account.
|
| • |
User Name: Enter your full email address using only lower case letters.
|
| • |
Password: Enter the password you chose for this email address using only lower case letters. Check REMEMBER PASSWORD if you don't want Outlook to ask you for the password each time you check your e-mail.
|
| • |
Incoming mail server (POP3): Enter secure.emailsrvr.com
|
| • |
Outgoing mail (SMTP) server : Enter secure.emailsrvr.com
|
| • |
Make sure that Log on using Secure Password Authentication (SPA) is NOT checked.
|
| • |
Click More Settings... when finished with this step. |
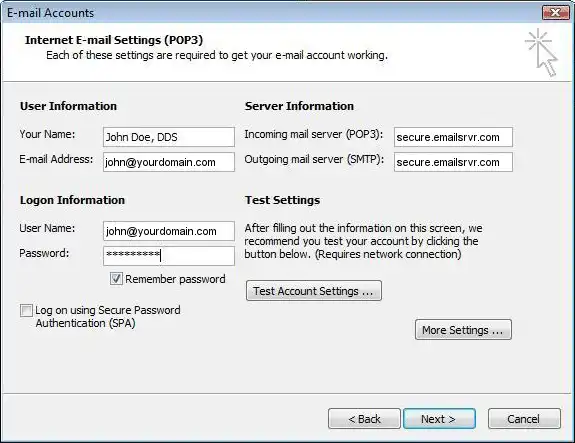 Step 6: Select the Outgoing Server tab. Check the box next to My outgoing server (SMTP) requires authentication. 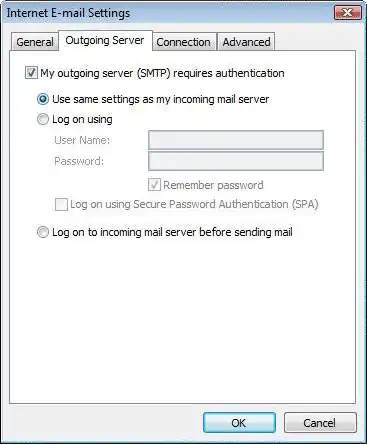 Step 7: Select the Advanced tab. Configure the Incoming and Outgoing ports as follows then click OK to go back to the main screen and then Next. 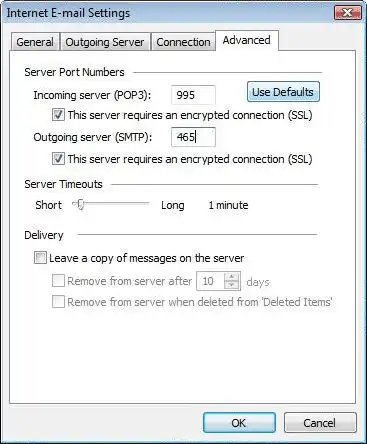 Step 8: Click Finish to complete the setup. 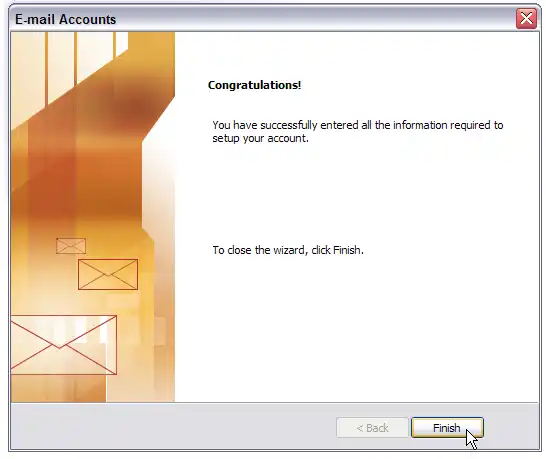
 Instructions SafelistInstructions to Add WEO Media to Safelist in: Outlook Express
Outlook Express: Open Microsoft Outlook Express.
| 1. |
Select Actions from the toolbar at the top of the screen.
|
| 2. |
Select Junk E-mail.
|
| 3. |
Select Junk E-mail Options.
|
| 4. |
Click the Safe Sender tab.
|
| 5. |
Click Add.
|
| 6. |
Type in @weomedia.com, then click okay |
Instructions for setting up email accounts in Microsoft Outlook Express
To use Outlook Express for sending and receiving email, follow the steps below.
Step 1: Open the program by clicking the Outlook Express icon located on your computer.  Step 2: Click Tools located on the top menu. Scroll down and click Accounts... 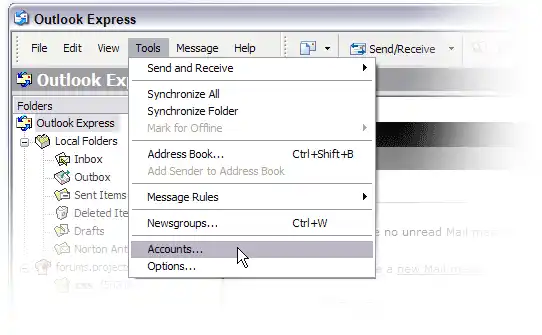 Step 3: Click the Add button and select the Mail option. 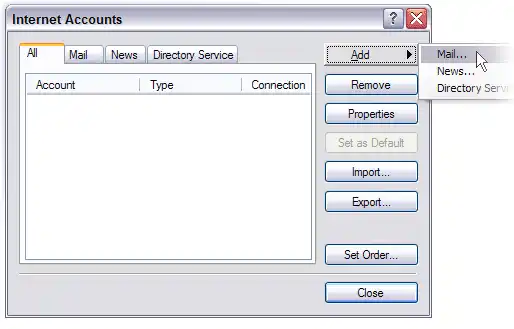 Step 4: Enter how you would like your name to appear on outgoing messages. Then click next. 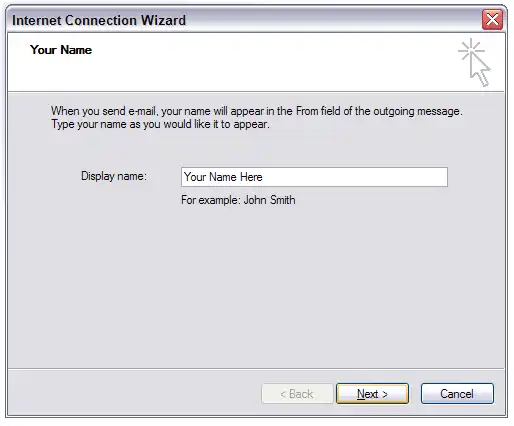 Step 5: Enter your email address for this account. Then click next. 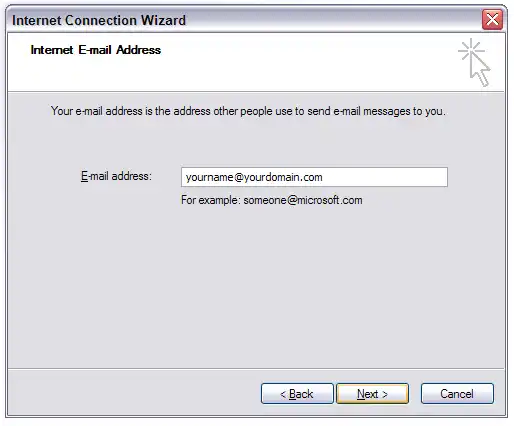 Step 6: Select POP3 as your incoming mail server. next, enter secure.emailsrvr.com as your Incoming mail server and secure.emailsrvr.com as your Outgoing mail (SMTP) server name in the input fields. Then click next. 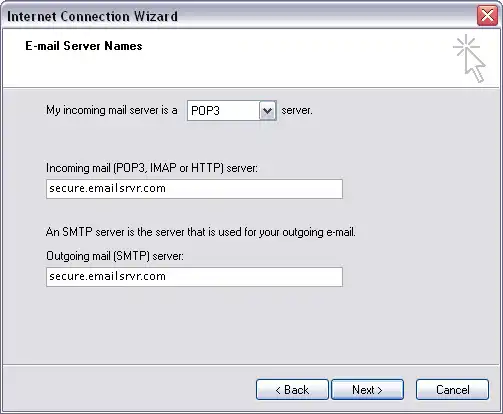 Step 7: Enter your full email address as your account name (use only lower case letters). Then enter your password (use only lower case letters) and place a check in the REMEMBER PASSWORD box. Then click next. 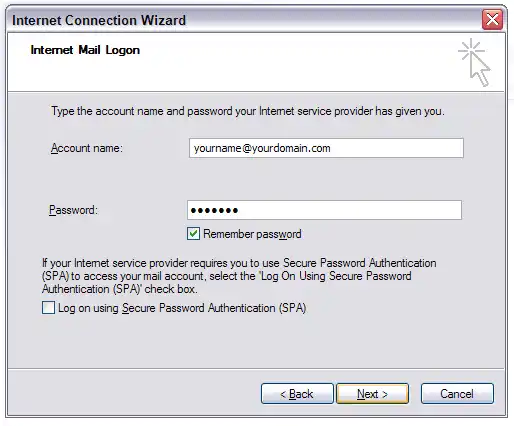 Step 8: Click Finish. 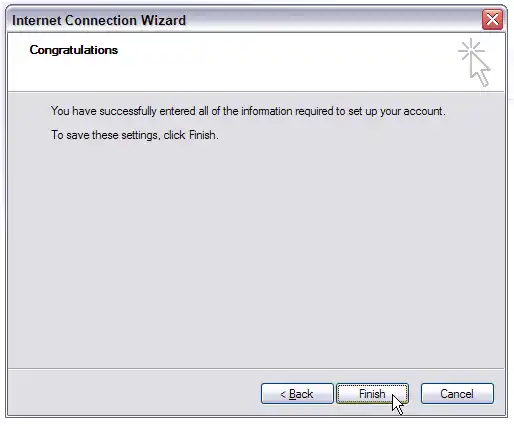 Step 9: Select your webmail account and click Properties. 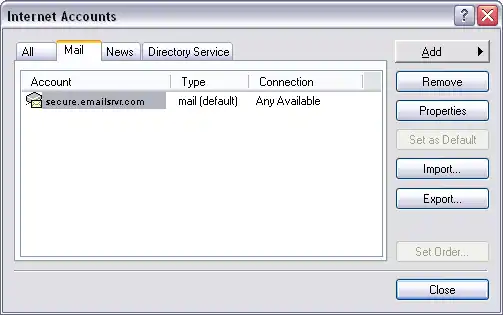 Step 10: Select the Servers tab. Check the box next to My server requires authentication. Then click Settings.  Step 11: Make sure that Use same settings as my incoming mail server is selected, then click OK. 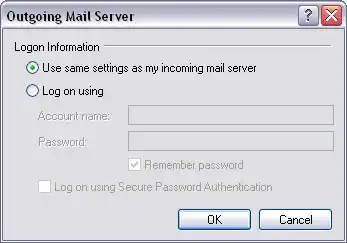 Step 12: Select the Advanced tag. Fill in the information as shown below then click OK. You have now successfully set up your email in Outlook Express. 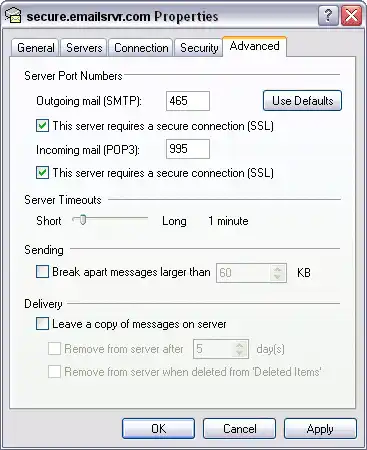
 Instructions SafelistInstructions to Add WEO Media to Safelist in: Microsoft Outlook 2011 for Mac
Microsoft Outlook 2011 for Mac: Open Microsoft Outlook 2011 for Mac.
| 1. |
From the Home tab, click Junk.
|
| 2. |
Select Safe Domains tab.
|
| 3. |
Enter @weomedia.com, using commas to separate multiple domains
|
| 4. |
Click okay |
Instructions for setting up email accounts in Microsoft Outlook 2011 for Mac
To use Microsoft Outlook 2011 for Mac for sending and receiving email, follow the steps below.
Step 1: Open the program by clicking the Microsoft Office Outlook icon located on your computer.  Step 2: Click Outlook located on the top menu. Click on Preferences... 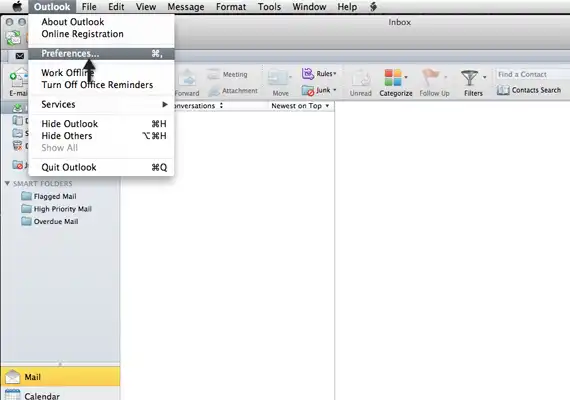 Step 3: Click on Accounts 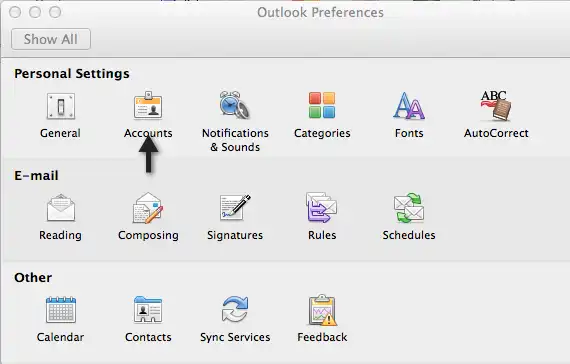 Step 4: Click on E-mail Account 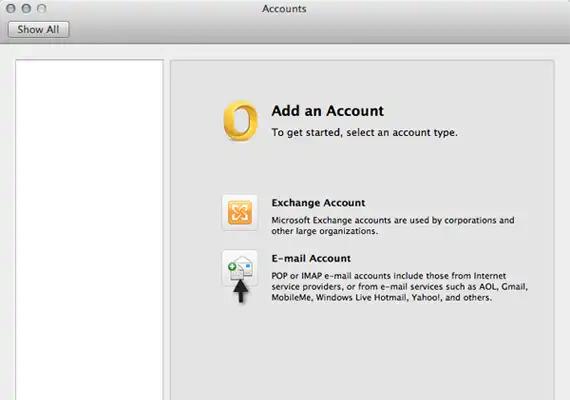 Step 5: Fill in your account information using Server Information listed below. Click on Add Account. 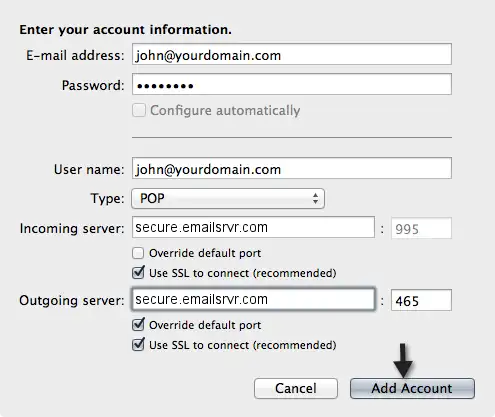
 Instructions SafelistInstructions to Add WEO Media to Safelist in: Mac OS X Mail
Mac OS X Mail: Open Mac OS X Mail.
| 1. |
Select Mail Preferences from the menu bar in Mac OS X Mail.
|
| 2. |
Click the Rules tab.
|
| 3. |
Click Add Rule.
|
| 4. |
Type a name in the Description field, such as "Whitelist: weomedia.com" to identify the new rule.
|
| 5. |
Make sure the criteria reads If any of the following conditions are met and that the From field is followed by Ends with.
|
| 6. |
Enter @weomedia.com in the field next to the Ends with field.
|
| 7. |
In the Perform the following actions section set the three fields to Move Message, to the mailbox, and Inbox or a different target folder.
|
| 8. |
Click OK to save the rule.
|
| 9. |
Close the Rules window. |
Instructions for setting up email accounts in Mac OS X Mail
To use Mac OS X Mail for sending and receiving email, follow the steps below.
Step 1: Open the program by clicking the Mac OS X Mail icon located on your computer.  Step 2: Select Mail / Preferences.
Step 3: Click the Accounts button, located at the top of the window.
Step 4: To add a new account, click the plus (+) button, located in the bottom left corner of the window, to launch the Setup Assistant.  Step 5: Fill in your incoming settings using server information listed below. Once completed click Continue...  Step 6: Fill in your outgoing mail information using server setting listed below. Once completed click continue...  Step 7: Review account summary and click create to complete email setup.  Step 8: Assigning SSL Secure Server Settings
After setting up your mail account, you can follow the steps below to adjust your email account settings to use the secure (SSL) server. | 1. |
Select Mail / Preferences.
|
| 2. |
Click the Accounts button, located at the top of the window.
|
| 3. |
Click once on your account, as it appears in the Accounts list. |
| 1. |
In the Incoming Mail Server box, enter the secure server name: secure.emailsrvr.com
|
| 2. |
Click the Advanced tab.
|
| 3. |
Check the Use Secure Sockets Layer (SSL) box.
|
| 4. |
The number in the Port box will change. |
 Step 9: To use the secure outgoing mail server
| 1. |
Click the Account Information tab.
|
| 2. |
Click the Server Settings button.
|
| 3. |
In the Outgoing Mail Server box, enter the secure server name: secure.emailsrvr.com
|
| 4. |
Check the Use Secure Sockets Layer (SSL) box.
|
| 5. |
Replace the default Server port with the secure port 465.
|
| 6. |
Click the OK button.
|
| 7. |
Close the Accounts window.
|
| 8. |
When prompted to save your changes, click the Save button. |

 Instructions SafelistInstructions to Add WEO Media to Safelist in: Entourage
Entourage: Open Entourage.
| 1. |
Click on Tools.
|
| 2. |
Click the Rules tab.
|
| 3. |
Click New (IMAP) or (POP) depending on which you are using.
If you are not sure which you are using click on Entourage > Account Settings... It should list your email account and whether it's IMAP or POP.
|
| 4. |
Give your rule a name, such as "Whitelist: weomedia.com" to identify the new rule.
|
| 5. |
Under Add Criterion, choose criteria for your rule.
|
| 6. |
Enter @weomedia.com.
|
| 7. |
Under Add Action select Move Message - Inbox.
|
| 8. |
Make sure there is a check mark in the box next to Enabled.
|
| 9. |
Click OK. |
Instructions for setting up email accounts in Entourage
To use Entourage for sending and receiving email, follow the steps below.
Step 1: Open the program by clicking the Entourage icon located on your computer.  Step 2: Click the Entourage Drop Down menu located in the upper left of the screen.  Step 3: Select Account Settings...
Step 4: To add a new account, click the New (+) button, located in the upper left corner of the Accounts window.  Step 5: Fill in your incoming settings using server information listed below. Once completed 'Click here for advanced receiving options'.  Step 6: Assigning SSL Secure Server Settings After filling out your email address, pop server and password. At the bottom of the Receiving mail section 'Click here for advanced receiving options button'. To use the secure incoming mail server
| 1. |
Check 'This POP service requires a secure connection (SSL)'
|
| 2. |
Override the default POP port to 995.
|
| 3. |
Click the square in the upper left to exit prompt. |
 Step 7: To secure outgoing mail server To secure outgoing mail server | 1. |
Click 'SMTP service requirs secure connection (SSL).
|
| 2. |
Override the default SMTP port. Change to 465.
|
| 3. |
Check SMTP server requires password authentication.
|
| 4. |
Click the square in the upper left to exit prompt.
|
| 5. |
Click Ok to finish setting up your mail! |

 Instructions SafelistInstructions to Add WEO Media to Safelist in: Iphone iOS 7.0
Iphone iOS 7.0: Open Iphone iOS 7.0 mail application.
| 1. |
Select All Inboxes.
|
| 2. |
Open the email.
|
| 3. |
Tap the sender's name in the From line.
|
| 4. |
On the next screen, tap Create New Contact.
|
| 5. |
Tap Done. |
Instructions for setting up email accounts in Iphone iOS 7.0
To use IPhone for sending and receiving email, follow the steps below.
Step 1: Click on Settings icon from your IPhone.  Step 2: Click on Mail, Contacts, Calendars  Step 3: Click on Add Account…  Step 4: Click on Other  Step 5: Click on Add Mail Account  Step 6: Fill in your Name, Email Address and Password to your account. Click Next.  Step 7: Click on POP and fill in your account information as listed below. Once completed click Save. (Settings may take a few moments to verify.)  Step 8: Your account has been successfully created.
 Instructions SafelistInstructions to Add WEO Media to Safelist in Android: Mail
Android: Mail: Open Android: Mail application.
| 1. |
Select All Inboxes.
|
| 2. |
Tap to open the email.
|
| 3. |
Tap the sender's name in the From line
|
| 4. |
Tap Add to VIPs. |
Instructions for setting up email accounts in Android: Mail
To use Android: Mail for sending and receiving email, follow the steps below.
Step 1: Launch the Settings app on your device. Once it launches, tap on Accounts. Tap on Add Account. Select Email as the Account Type 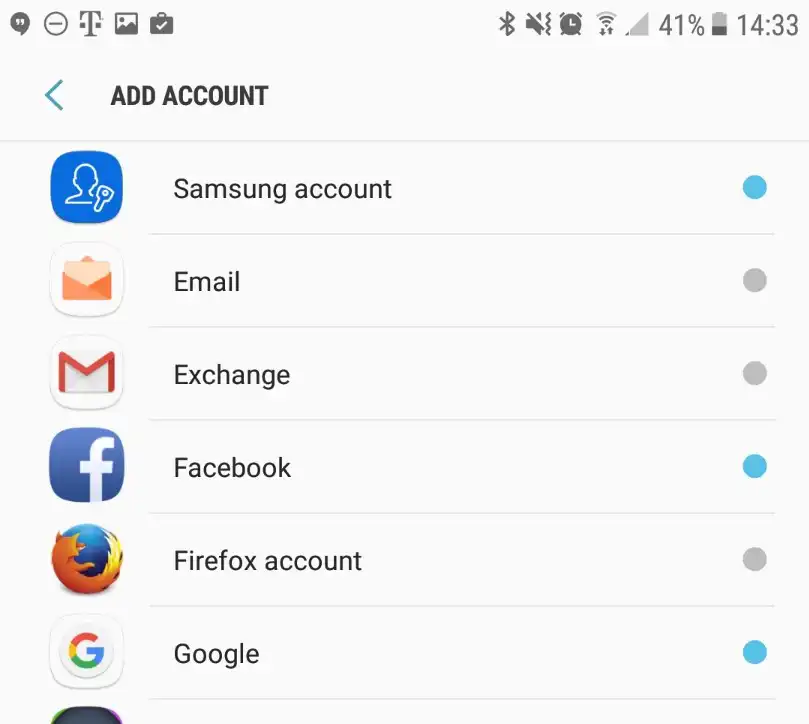
Step 2: Email address: Your email address Password: Your mailbox password and Tap Sign In 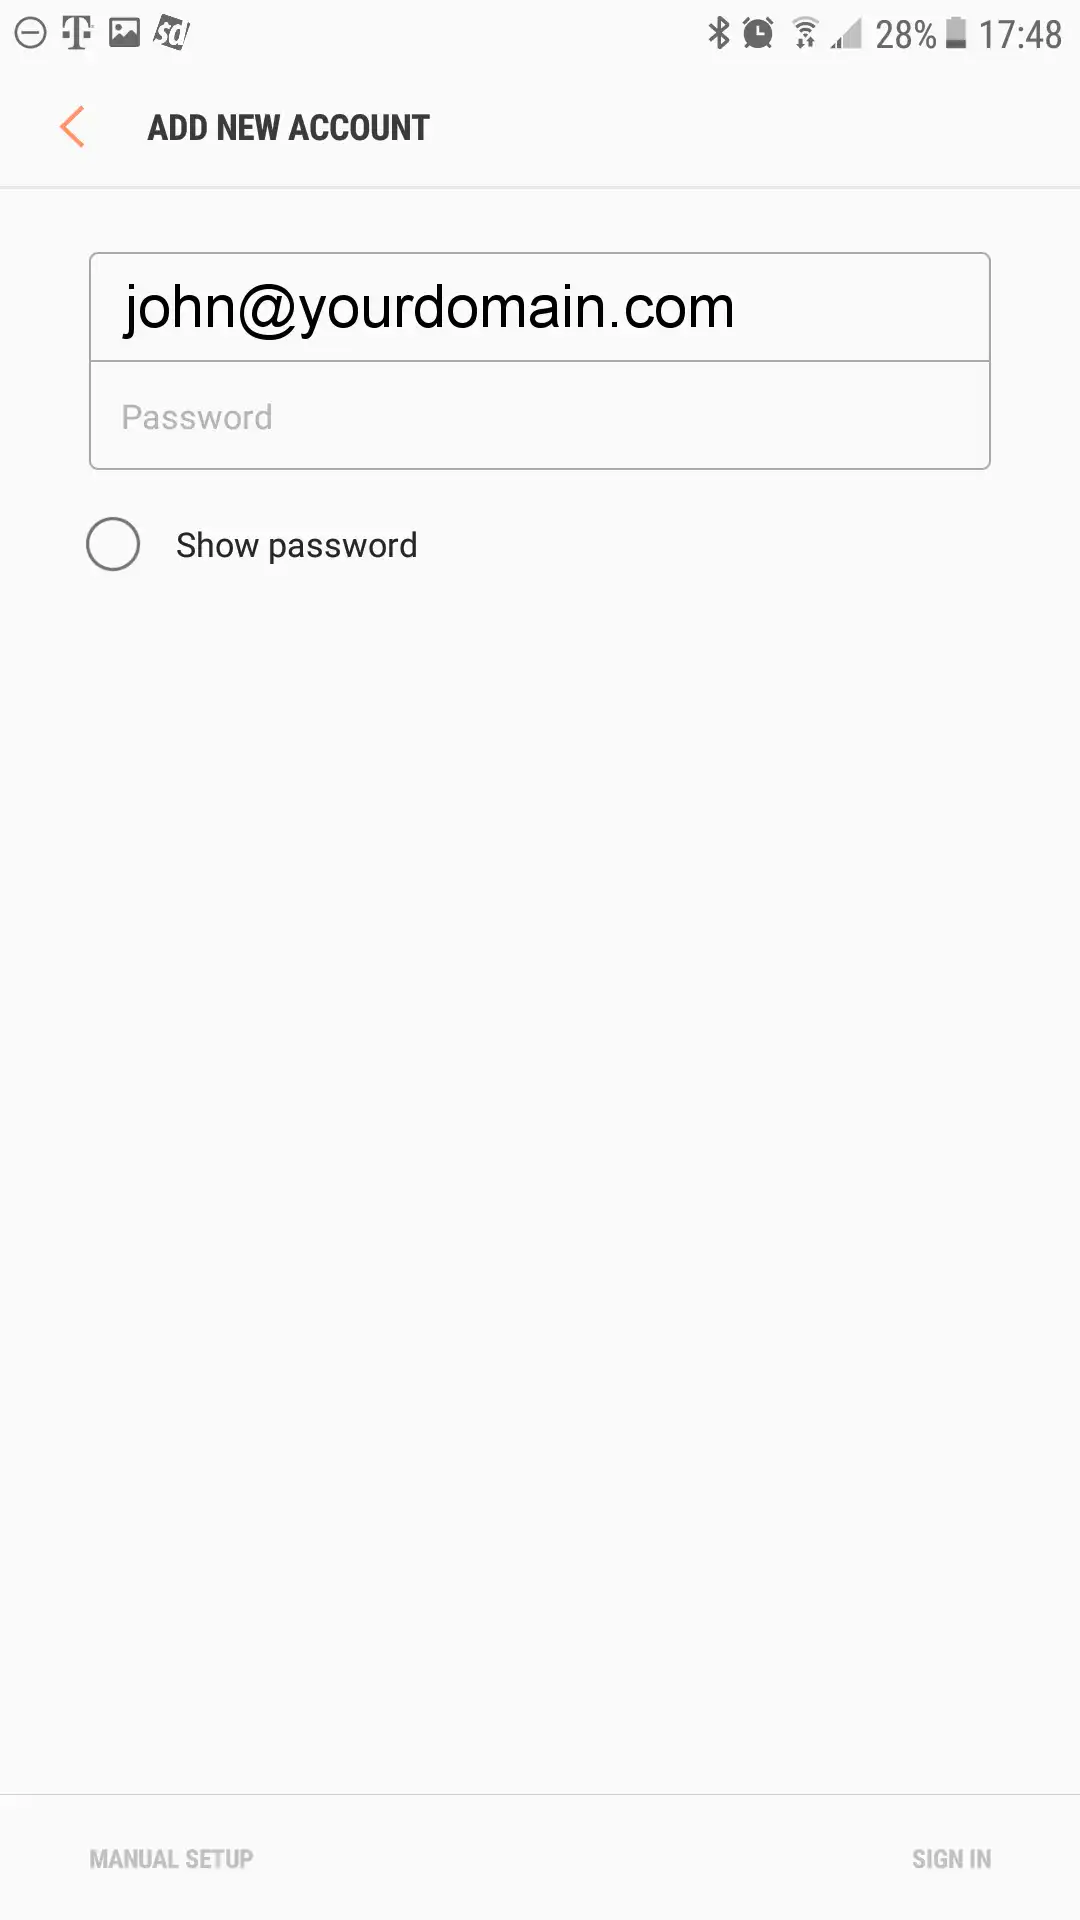 Step 3: Tap IMAP account 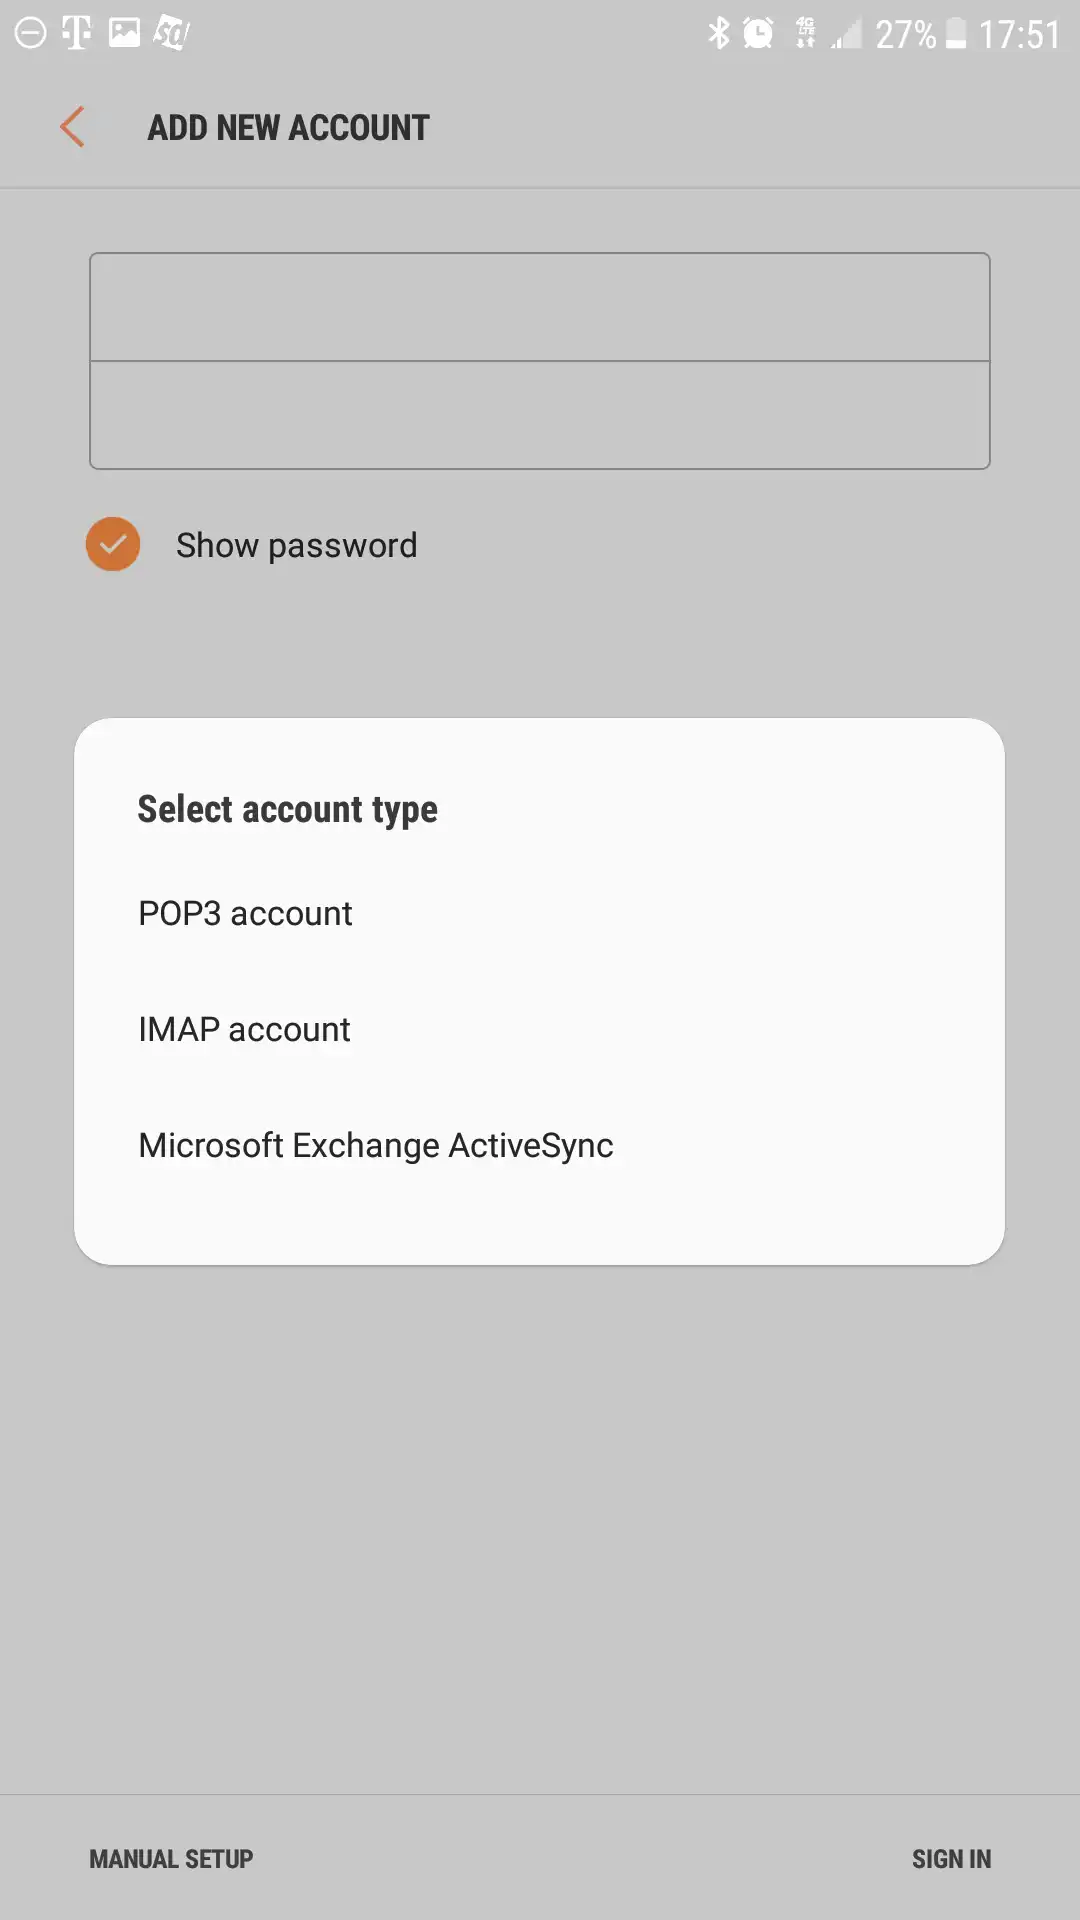 Step 4: Enter the following server details: | • |
Email address: Your emaill address
|
| • |
Username: Your emaill address
|
| • |
Password: Your mailbox password |
| • |
IMAP Server: secure.emailsrvr.com
|
| • |
Security Type: SSL
|
| • |
Port: 993 |
| • |
SMTP Server: secure.emailsrvr.com
|
| • |
Security Type: SSL
|
| • |
Port: 465
|
| • |
Authentication required before sending emails: On
|
| • |
Username: Your emaill address
|
| • |
Password: Your mailbox password |
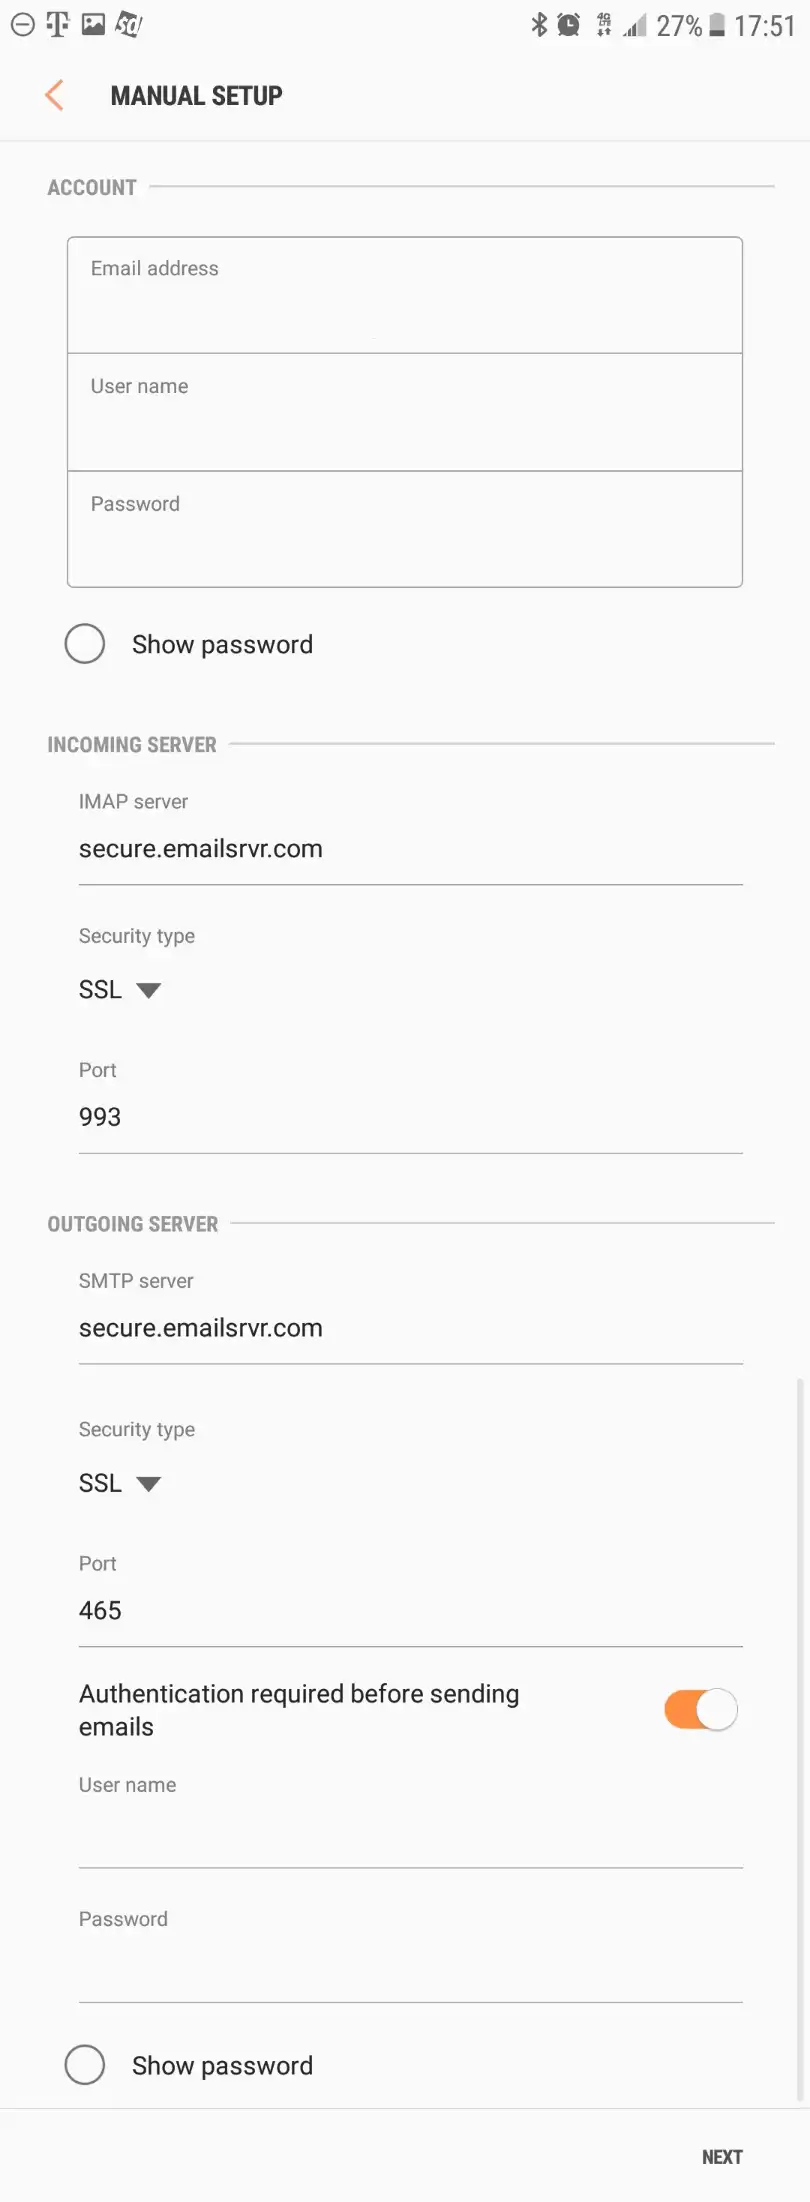 Step 5: Tap Next Authentication failed? This means that your username or password are incorrect
| • |
Make sure your user name is typed as shown above and that you did not make a typo (it happens!)
|
| • |
Try accessing webmail via a web browser
If your browser has a saved password, remove it and manually enter it, to make sure you're using the same password you tried on your mobile device
|
| • |
If you cannot access webmail, you will need to reach out to your email admin for a possible password reset.
|
| • |
If you can access webmail, triple check you're typing the same password you used for webmail
|
| • |
If issues persist, contact your email admin |
Step 6: Modify the settings as desired Tap Next 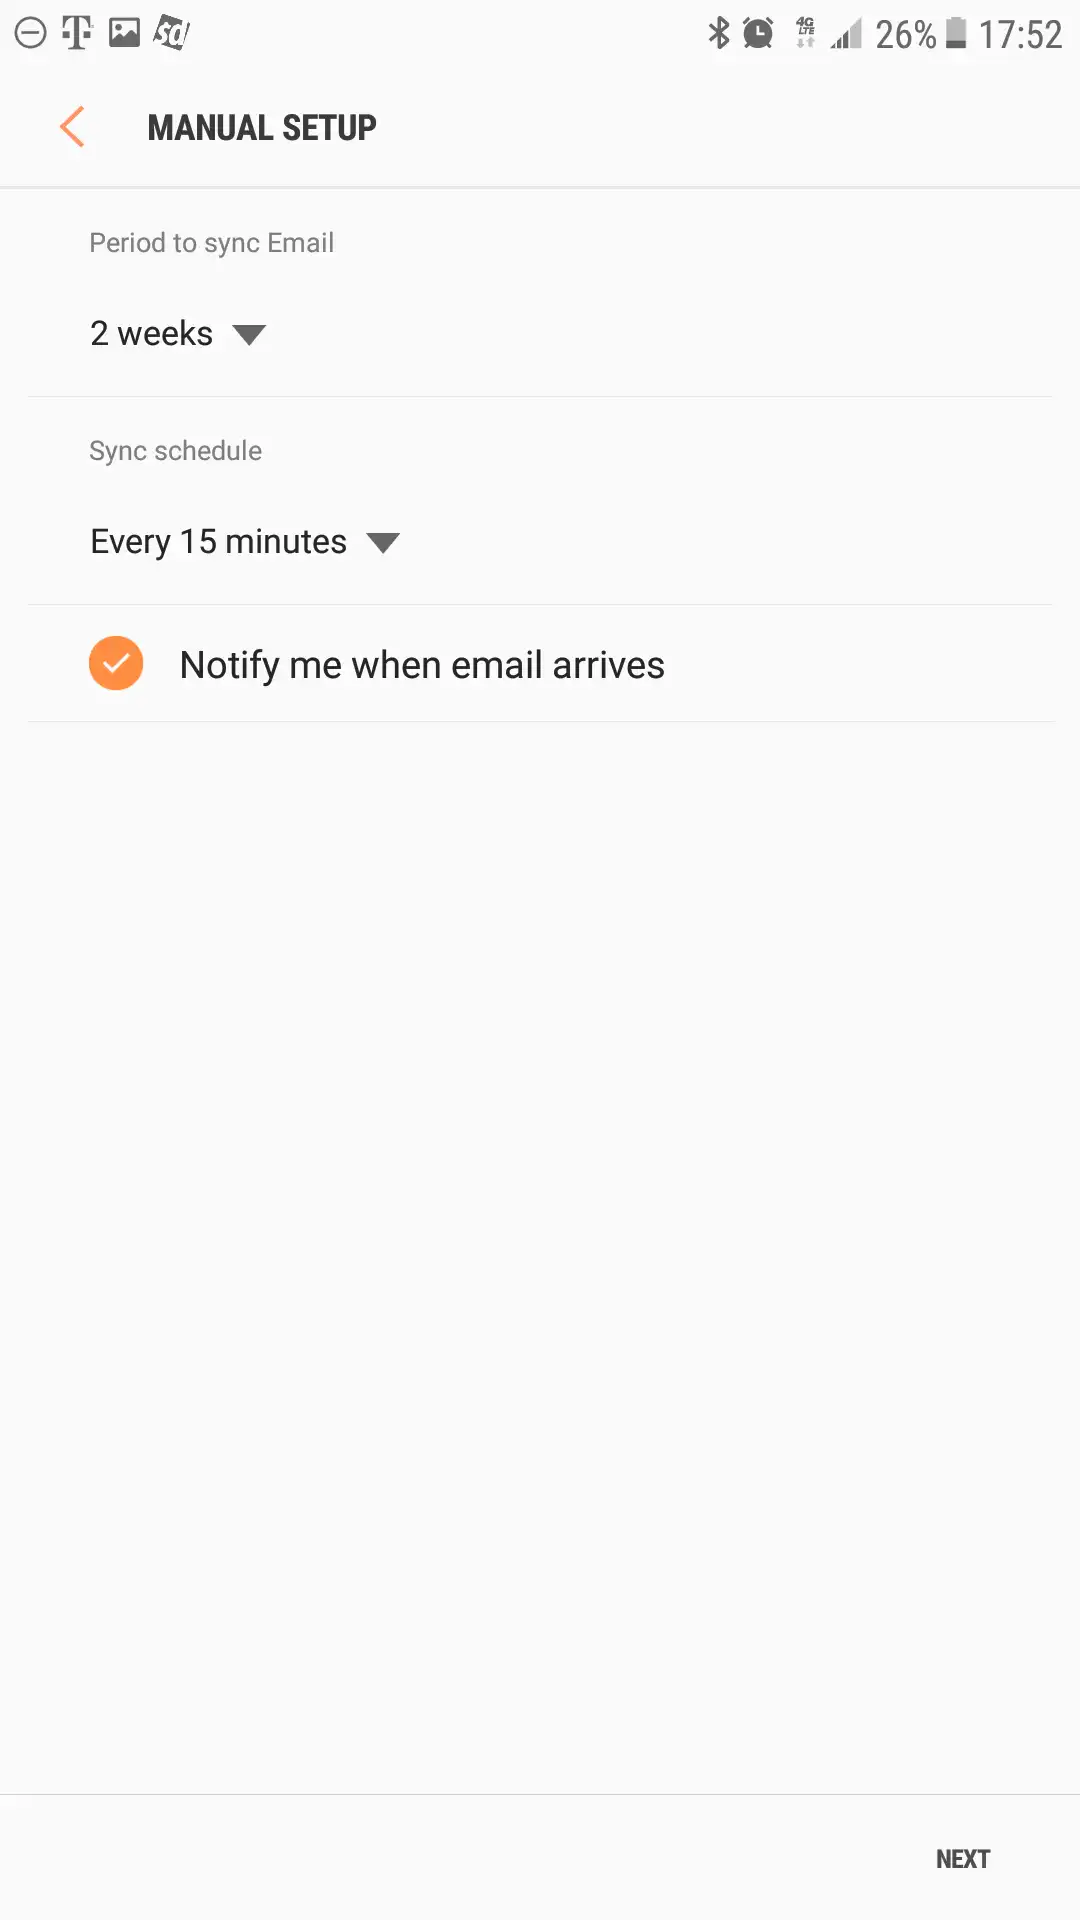 Step 7: Account Name: Used to distinguish the account in your device Your Name: Name shown on outgoing emails 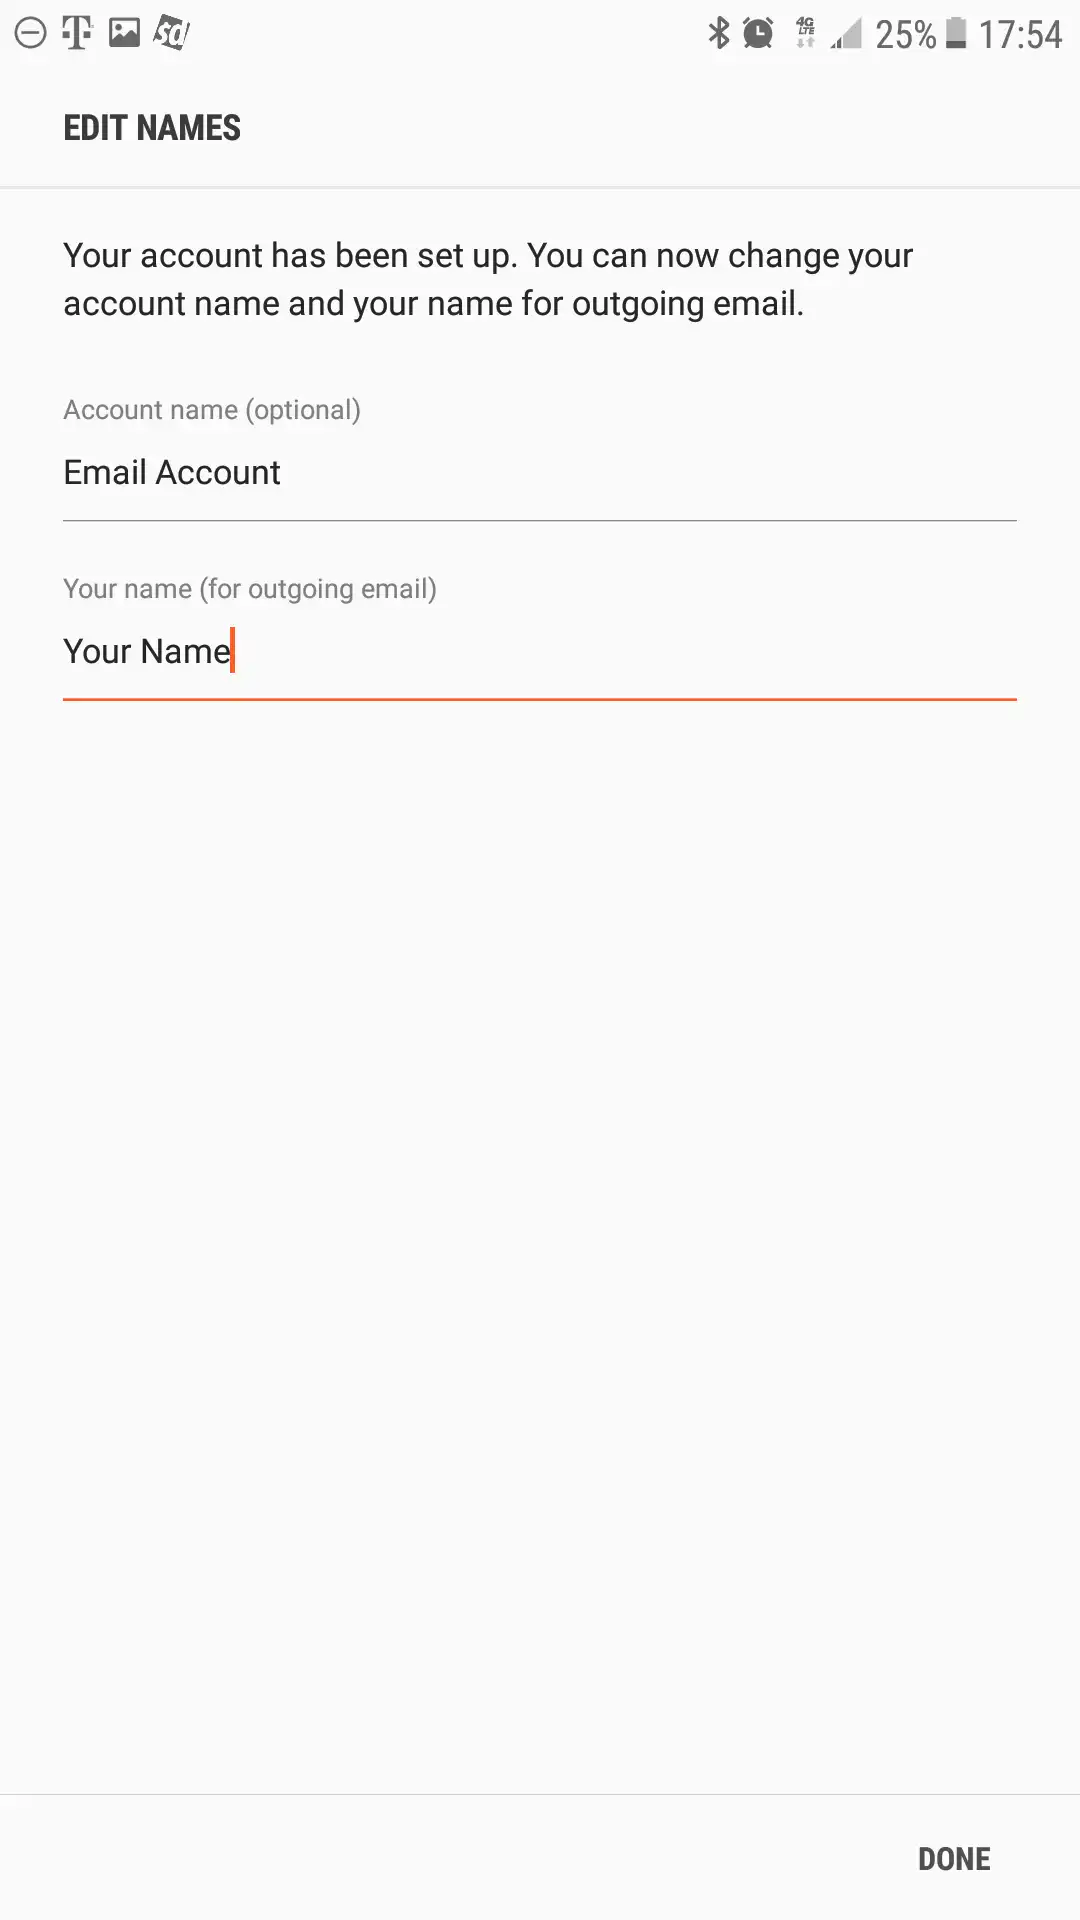 Step 8: You are all set! Go back to the main menu, open the Email app and your messages should start syncing.
 Instructions SafelistInstructions to Add WEO Media to Safelist in Android: Gmail
Gmail: Instructions for setting up email accounts in Android: Gmail | 1. |
Select All Inboxes.
|
| 2. |
Tap to open the email.
|
| 3. |
Tap the Icon next to the sender's name in the From line
|
| 4. |
Tap + icon.
|
| 5. |
Create a new contact or update an existing contact. |
Instructions for setting up email accounts in Android: Gmail
To use Android: Gmail for sending and receiving email, follow the steps below.
Step 1: Launch the Settings app on your device. Once it launches, tap on Accounts. Tap on Add Account. Select Personal (IMAP), near the bottom of the screen, as the Account Type 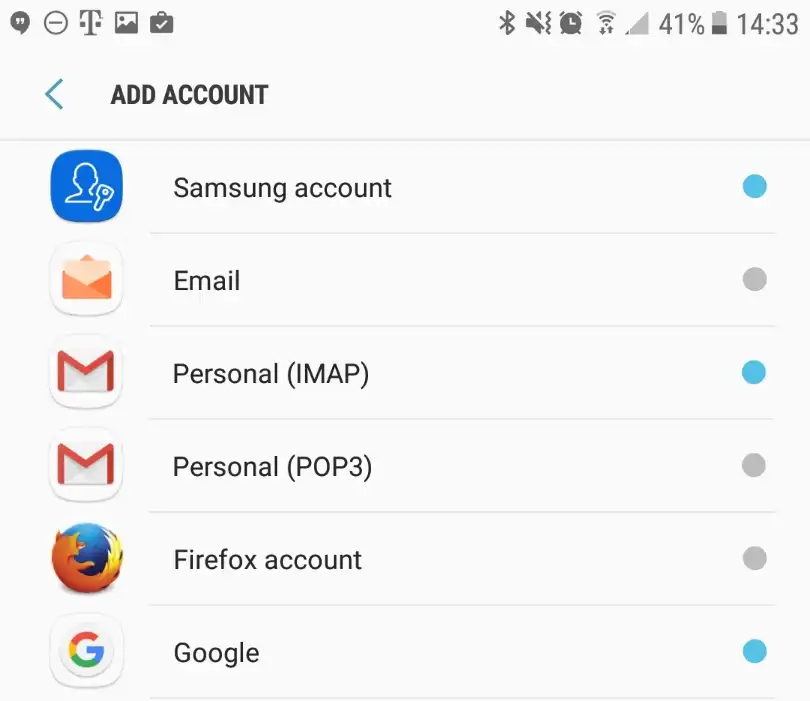
Step 2: Enter your email address. 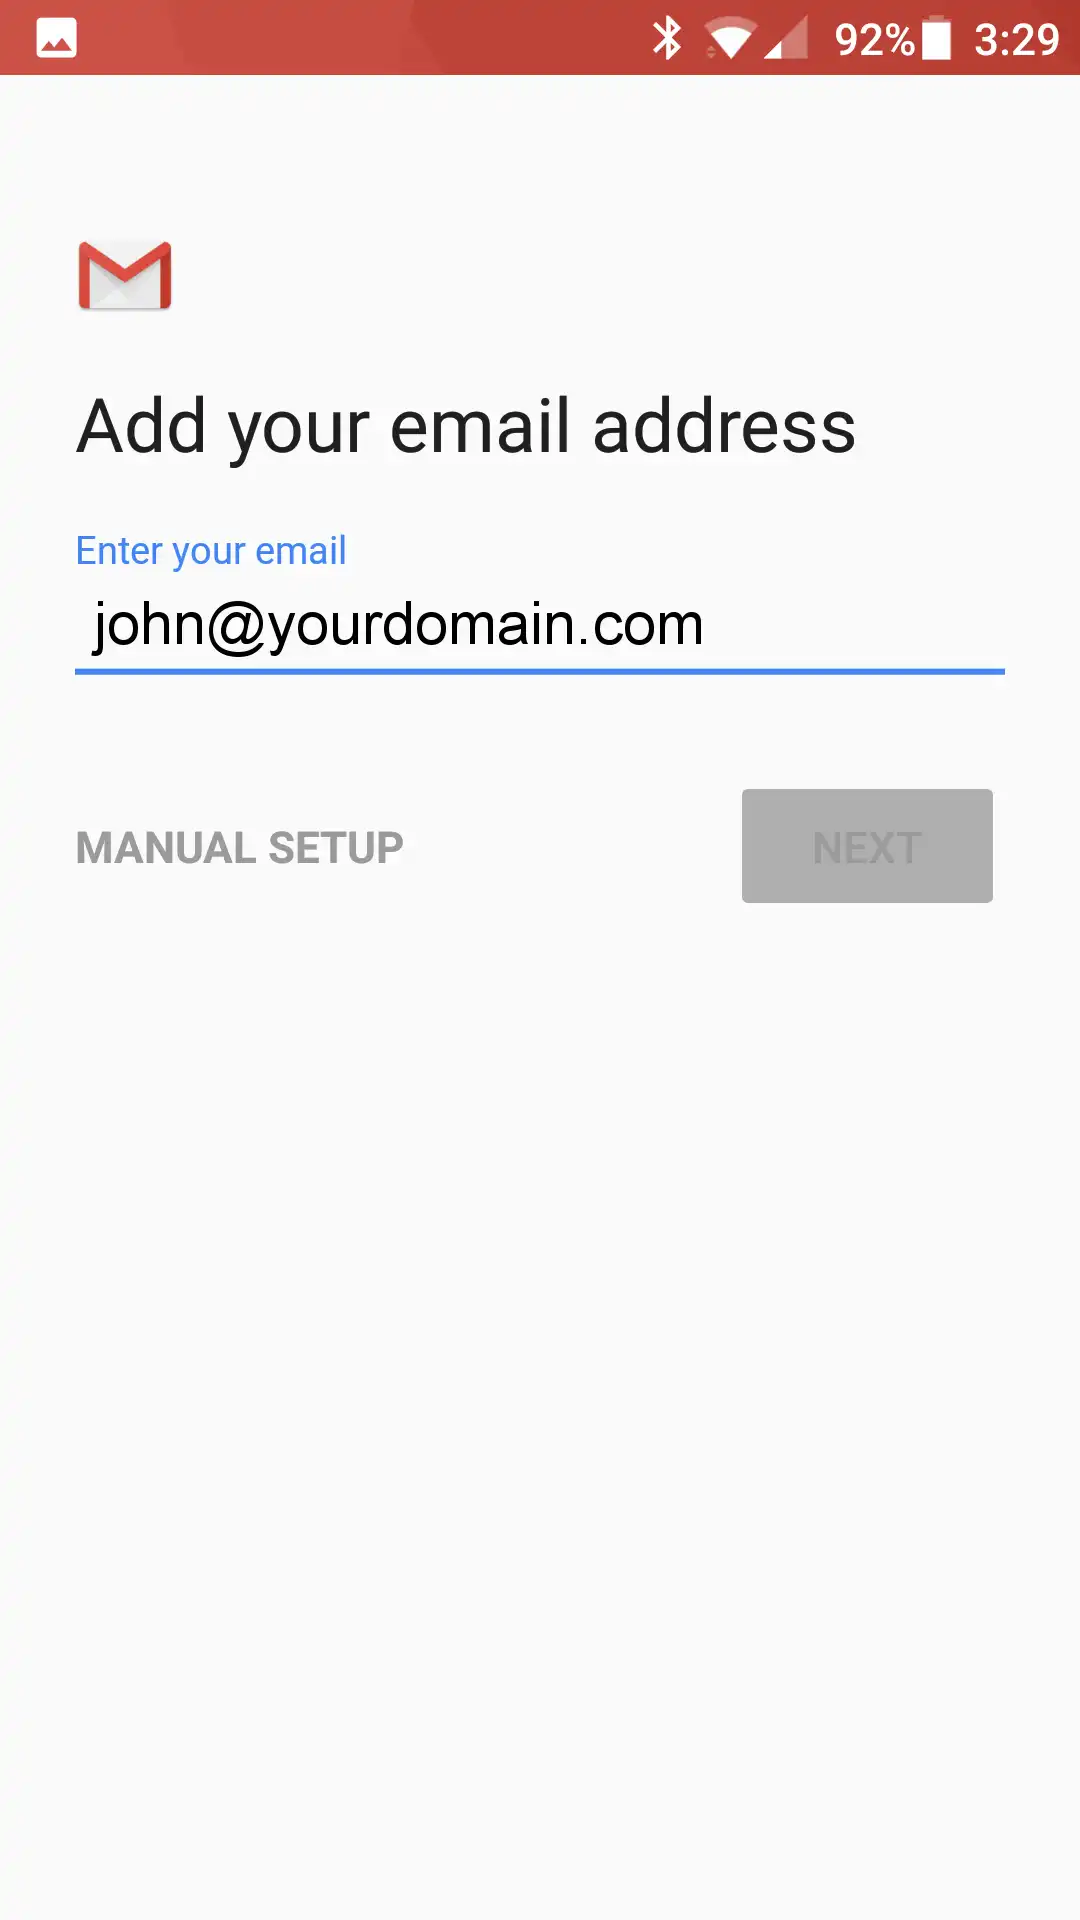 Step 3: Type your mailbox password 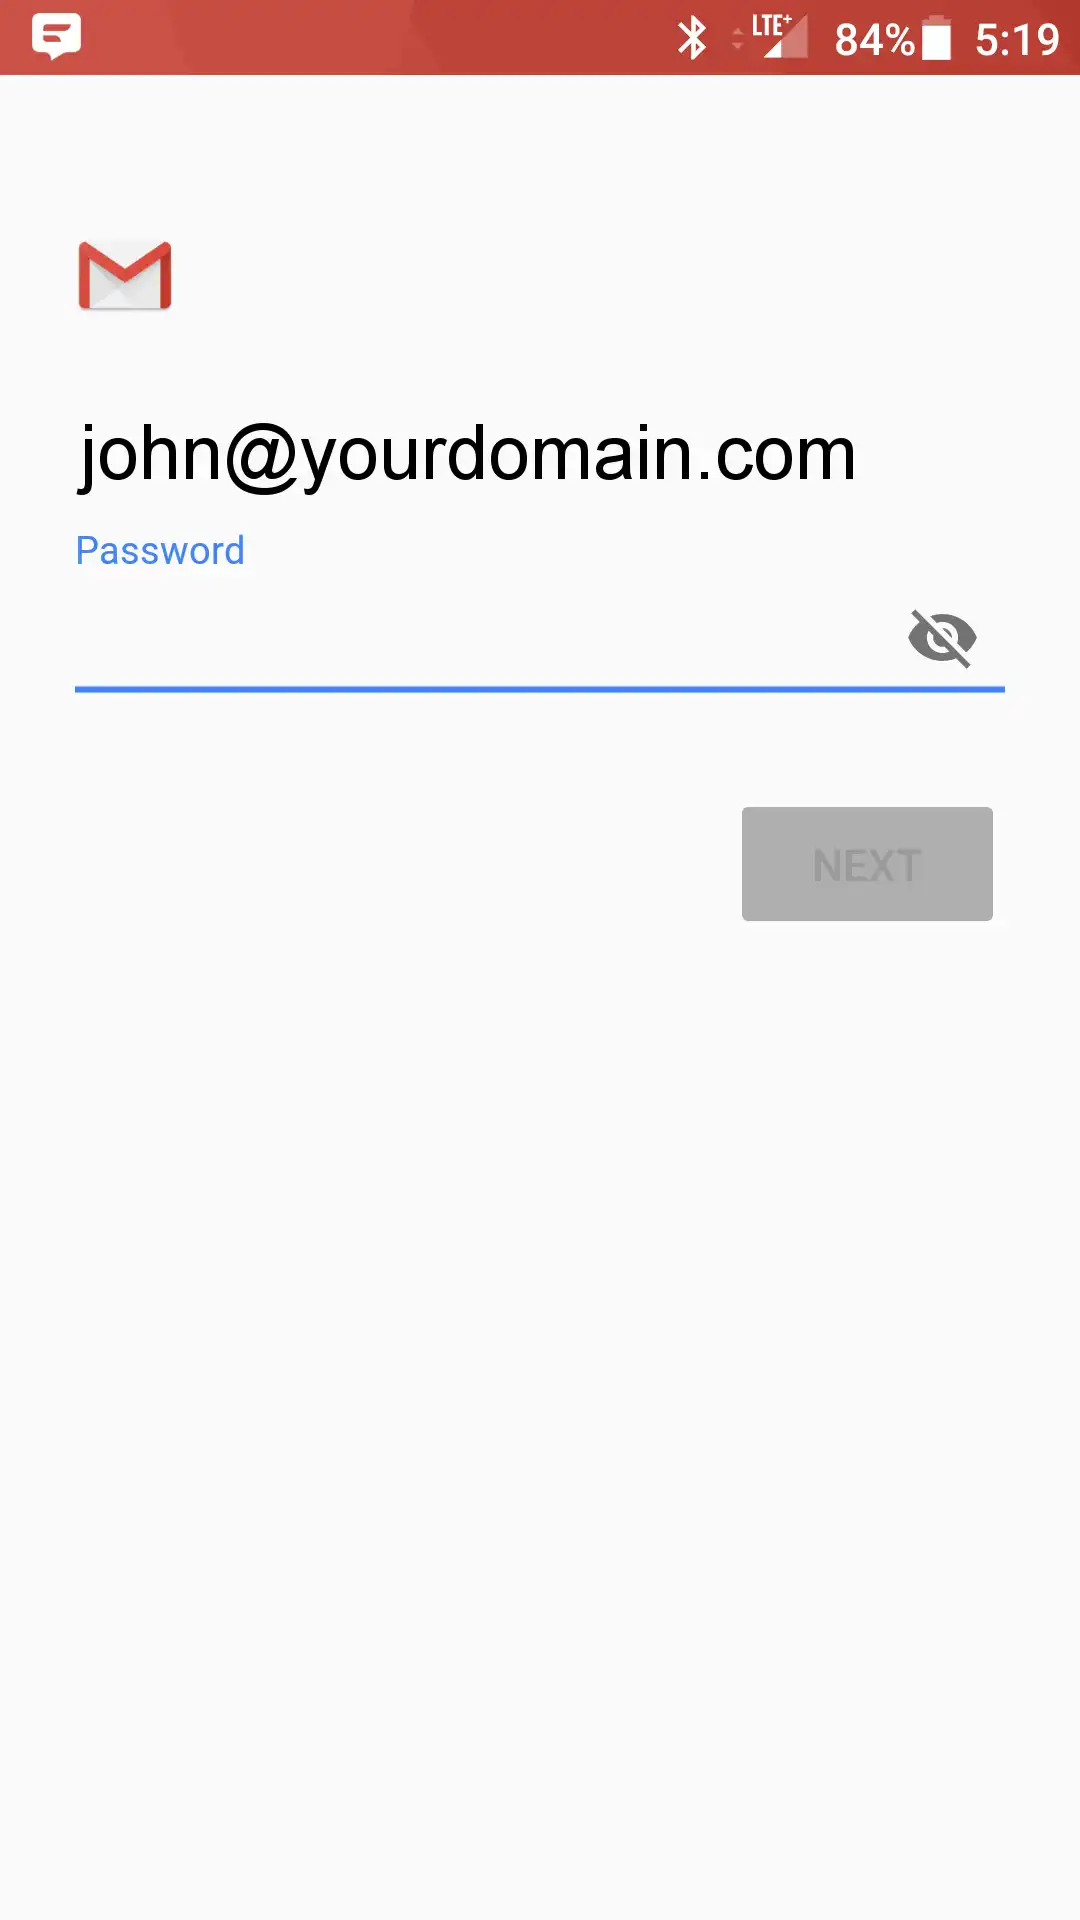 Step 4: Enter the following incoming settings: | • |
Username: Your emaill address
|
| • |
Password: Your mailbox password
|
| • |
Server: secure.emailsrvr.com |
Tap Next 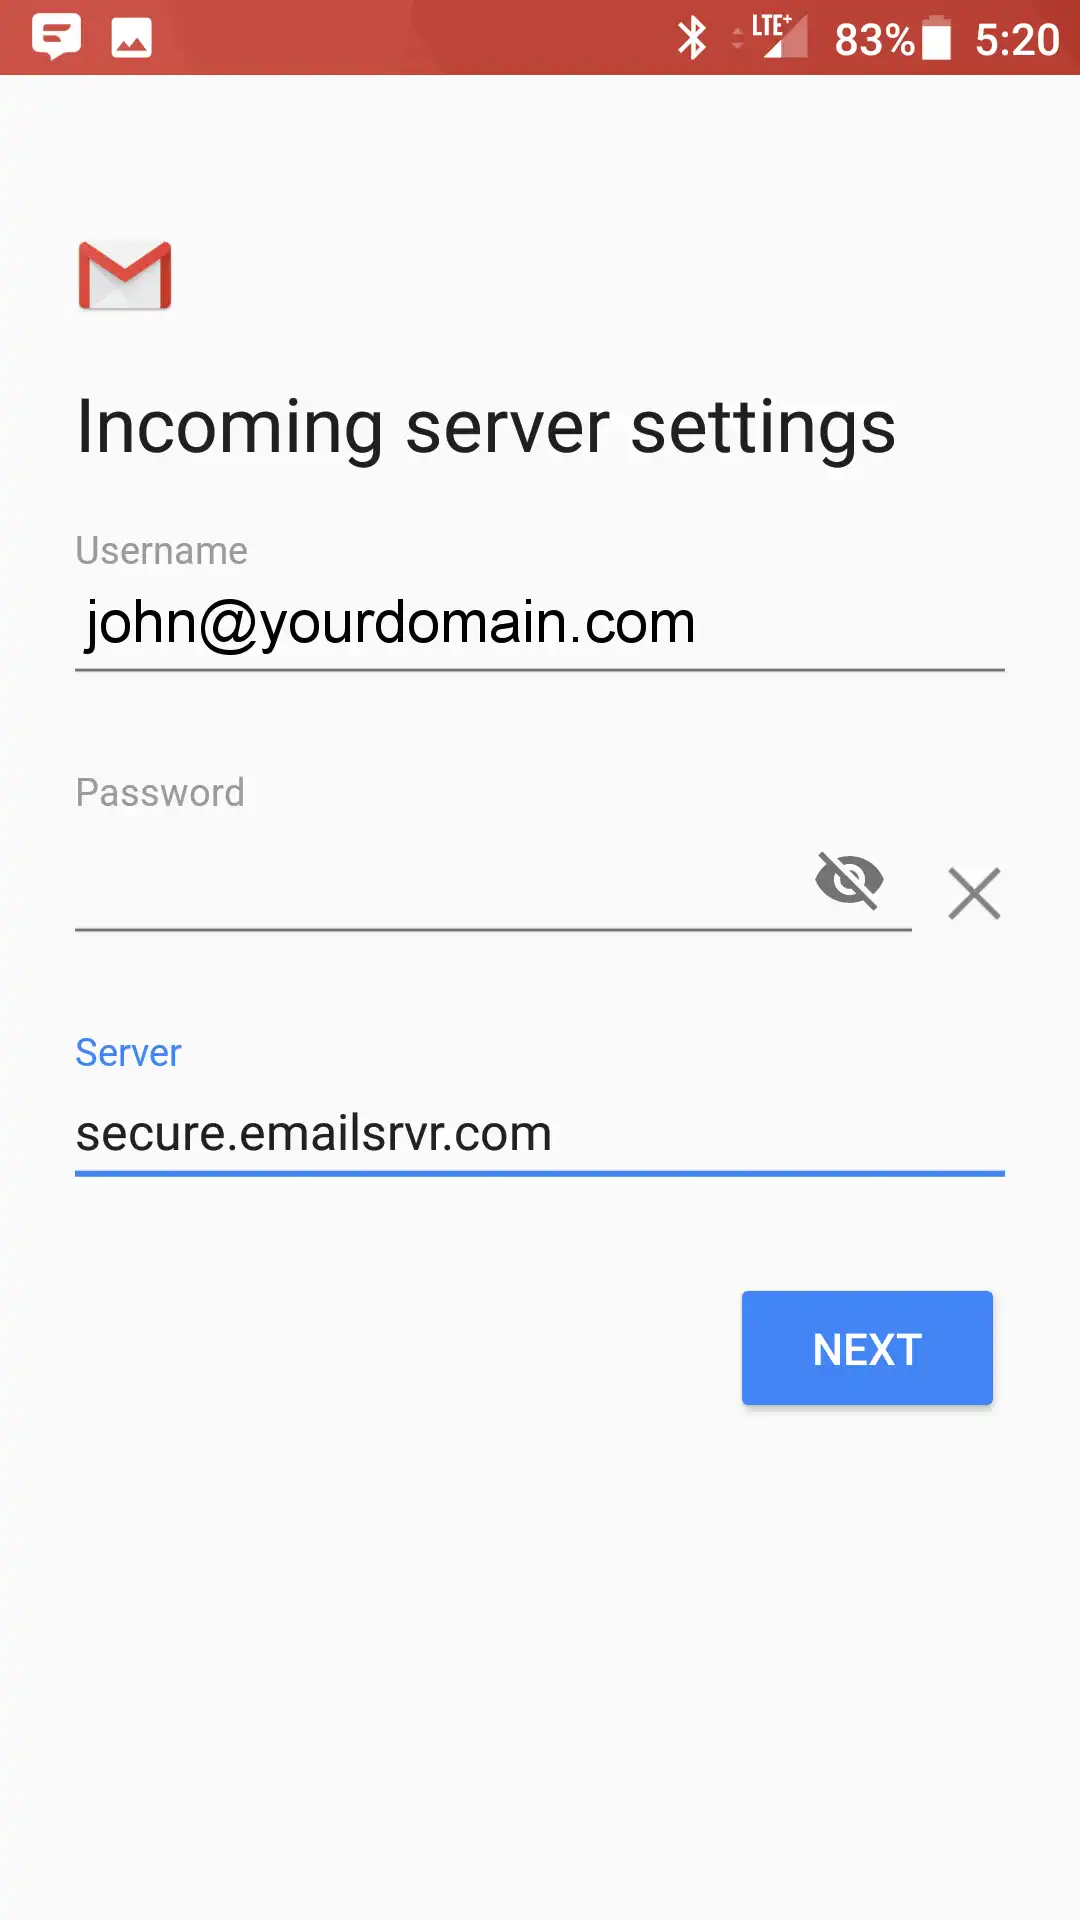
Authentication failed? This means that your username or password are incorrect
| • |
Make sure your user name is typed as shown above and that you did not make a typo (it happens!)
|
| • |
Try accessing webmail via a web browser
If your browser has a saved password, remove it and manually enter it, to make sure you're using the same password you tried on your mobile device
|
| • |
If you cannot access webmail, you will need to reach out to your email admin for a possible password reset.
|
| • |
If you can access webmail, triple check you're typing the same password you used for webmail
|
| • |
If issues persist, contact your email admin |
Step 5: Enter the following outgoing settings: Make sure Require signin is enabled. | • |
Username: Your emaill address
|
| • |
Password: Your mailbox password
|
| • |
SMTP Server: secure.emailsrvr.com
|
| • |
Port (if prompted): 465 with SSL |
Tap Next 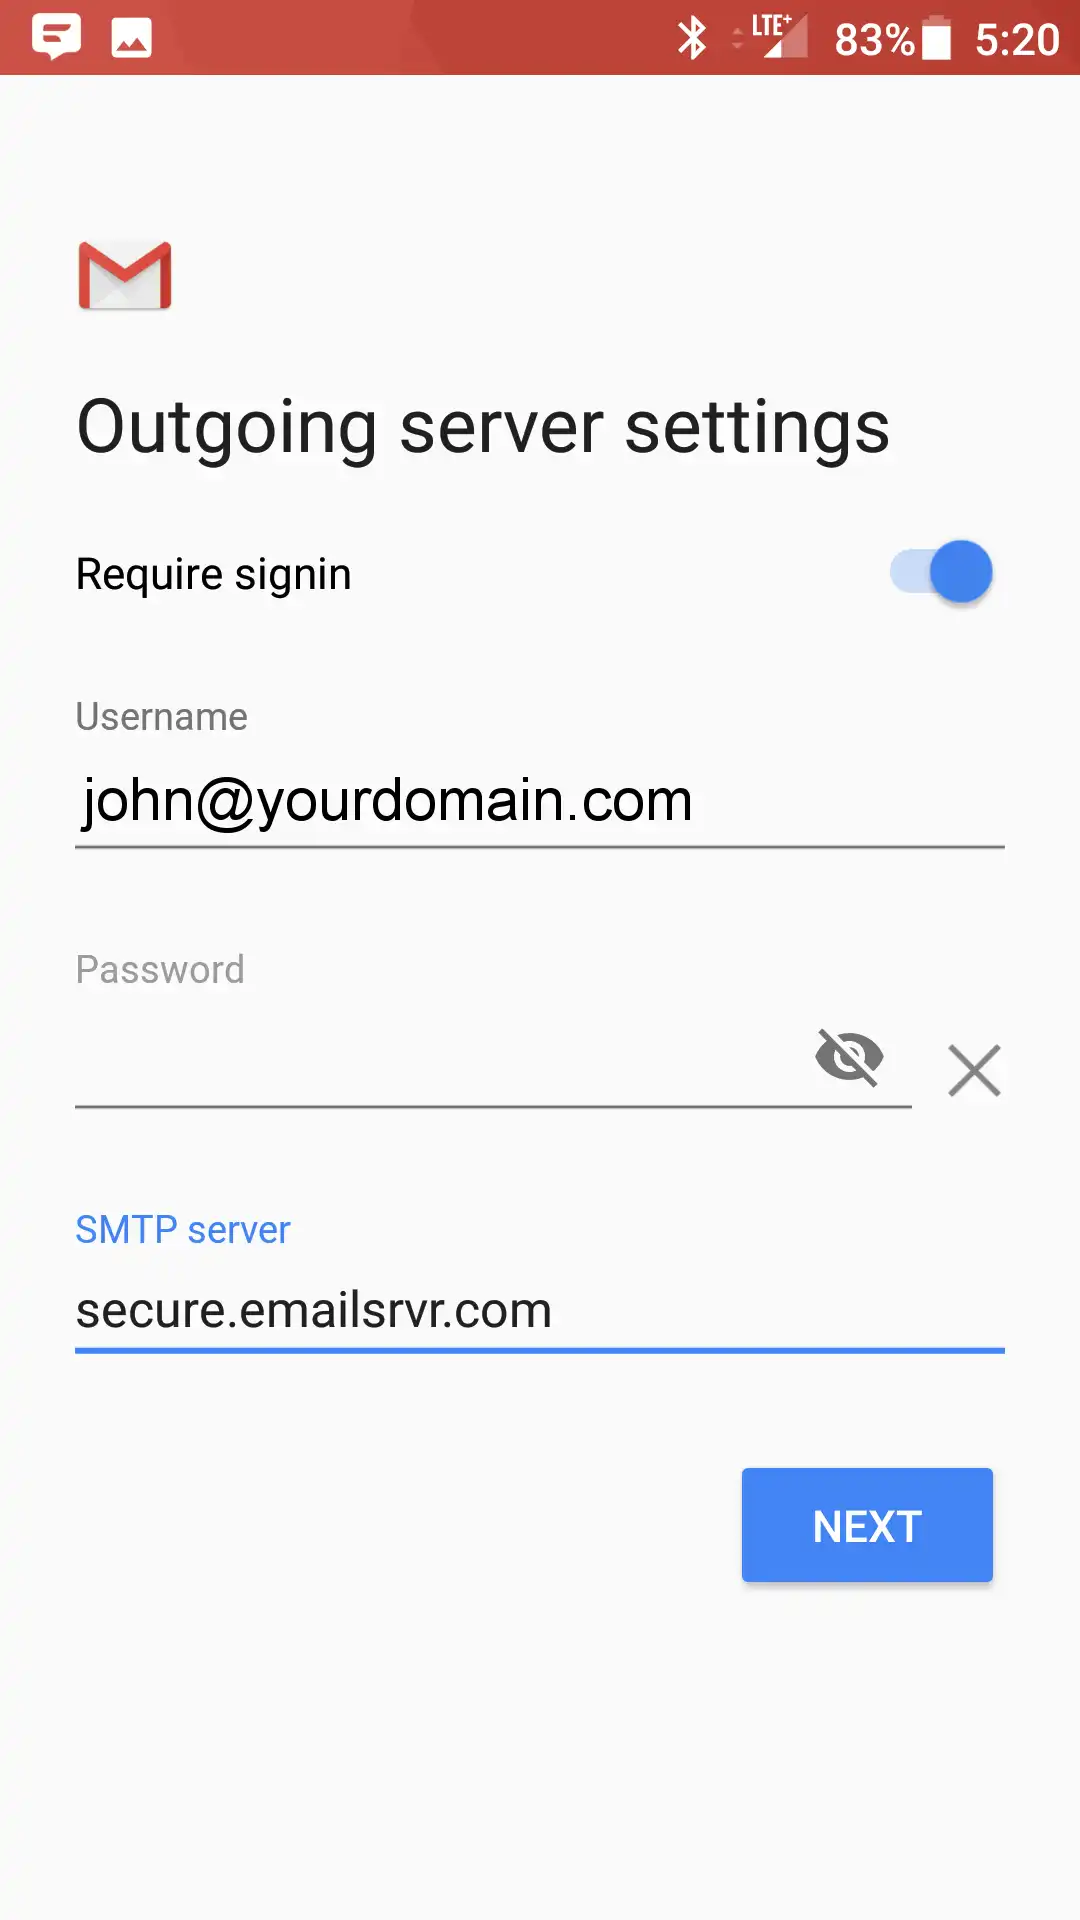
Authentication failed? This means that your username or password are incorrect
| • |
Make sure your user name is typed as shown above and that you did not make a typo (it happens!)
|
| • |
Try accessing webmail via a web browser
If your browser has a saved password, remove it and manually enter it, to make sure you're using the same password you tried on your mobile device
|
| • |
If you cannot access webmail, you will need to reach out to your email admin for a possible password reset.
|
| • |
If you can access webmail, triple check you're typing the same password you used for webmail
|
| • |
If issues persist, contact your email admin |
Step 6: Select the options desired, and tap Next 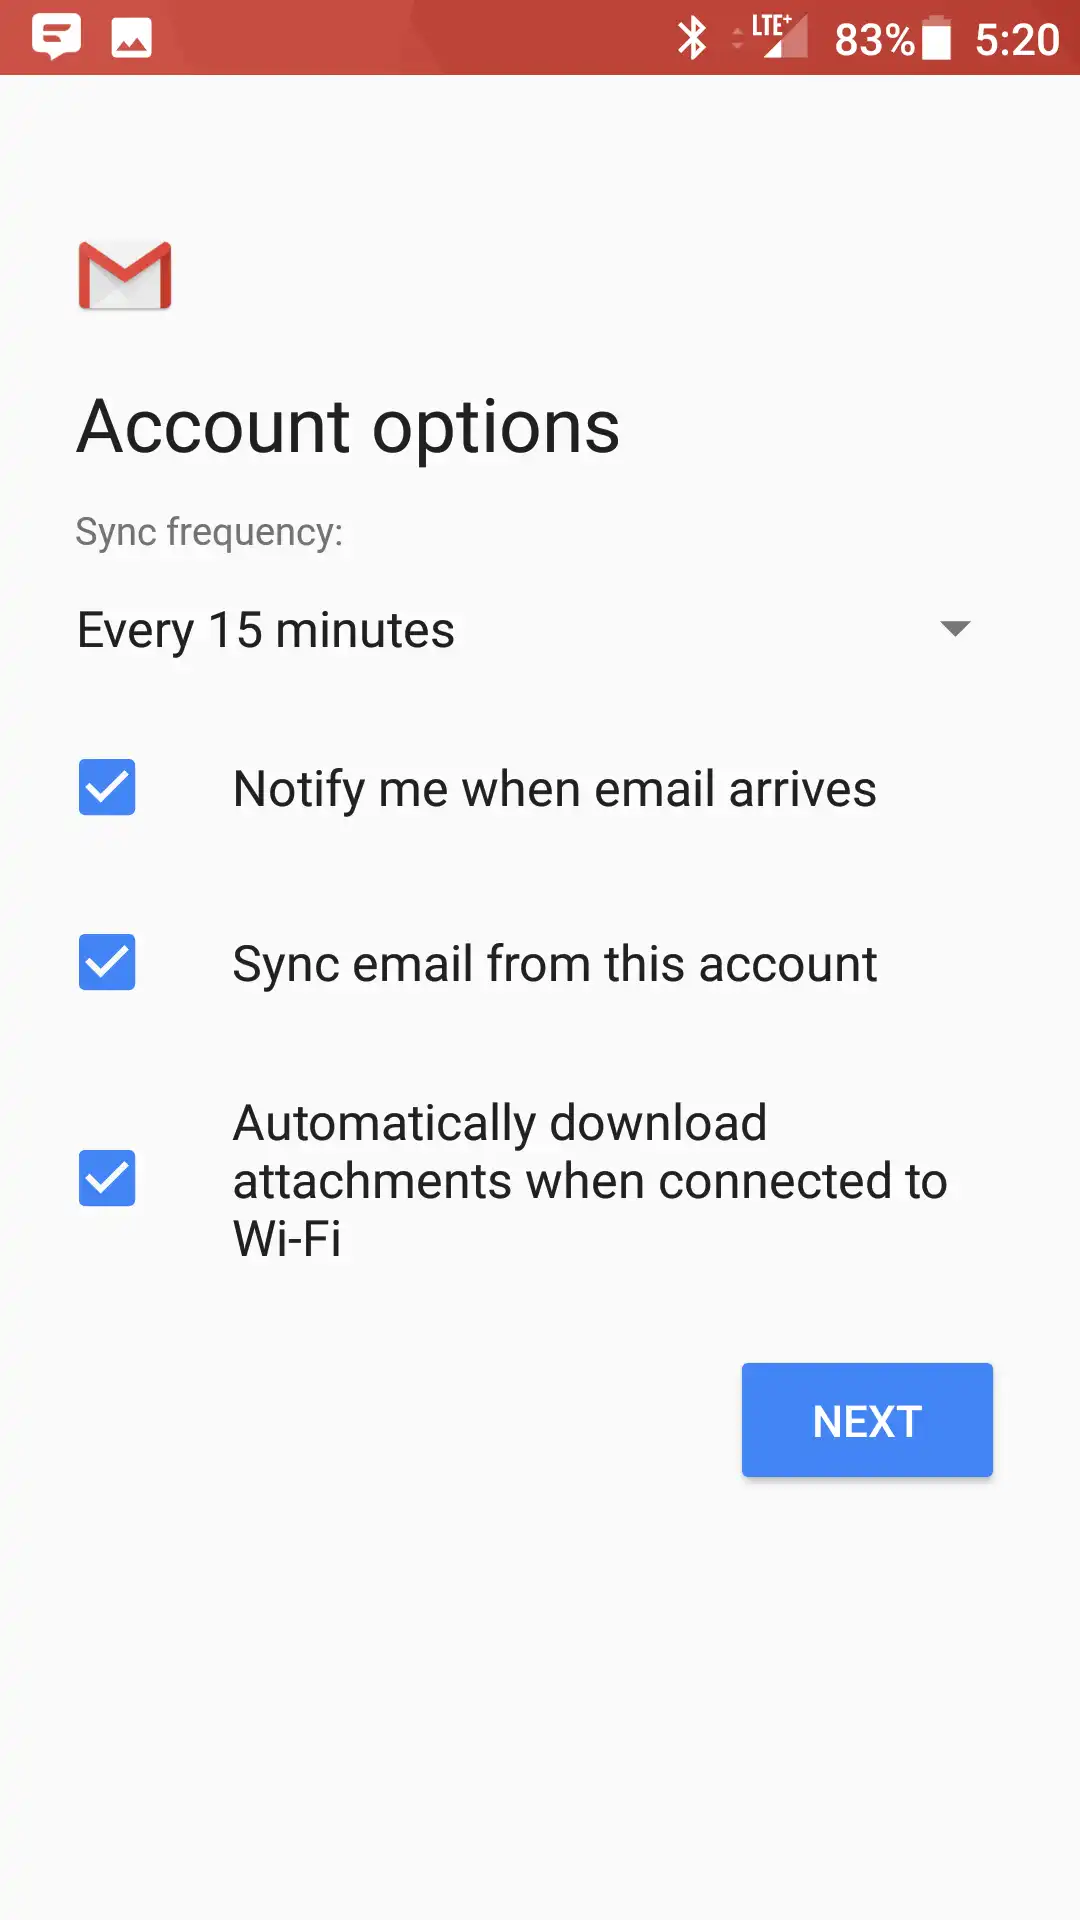 Step 7: Account Name: Used to distinguish account from others in the device Your Name: Name to be displayed in outgoing messages Tap Next 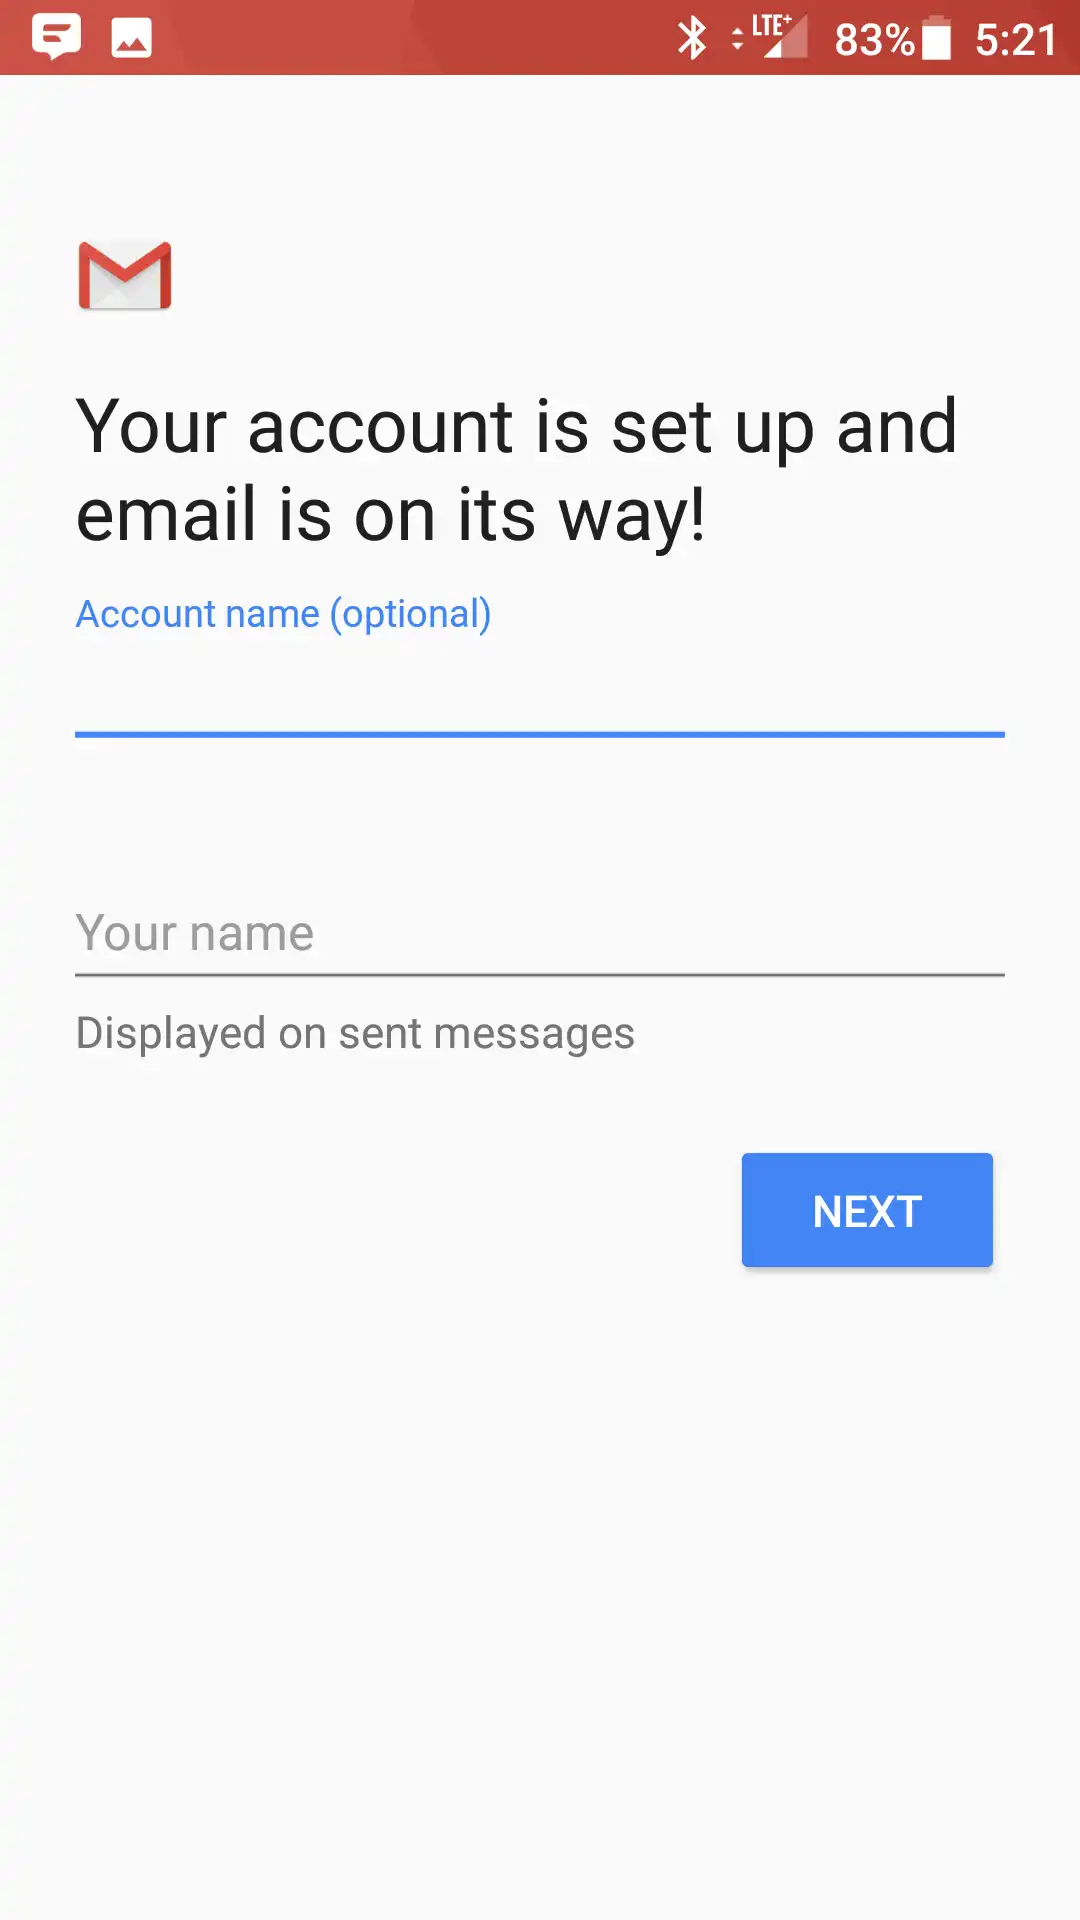 Step 8: You are all set! Go back to the main menu, open the Gmail app and your messages should start syncing.
Email Client Server Settings
Incoming - POP3 Settings*
Incoming Mail Server Settings: secure.emailsrvr.com
Standard POP Port: 995
This server requires an encrypted SSL connection
Incoming - IMAP Settings**
Incoming Mail Server Settings: secure.emailsrvr.com
Standard IMAP Port: 993
This server requires an encrypted SSL connection
Outgoing - SMTP Settings
Outgoing Mail Server Settings: secure.emailsrvr.com
Standard SMTP Port: 465
SMTP Auth is required
Same username and password
This server requires an encrypted SSL connection
*Note: IMAP email access coordinates between the server and your mail application. Messages that have been read/deleted/replied-to will show as read/deleted/replied-to both within webmail and in the mail application. POP3 does not coordinate with the server. Messages marked as read/deleted/replied-to in the mail application will not show as read/deleted/replied-to in webmail. This also means that future downloads of your inbox or other mailboxes with POP3 will show all messages as unread.
|


